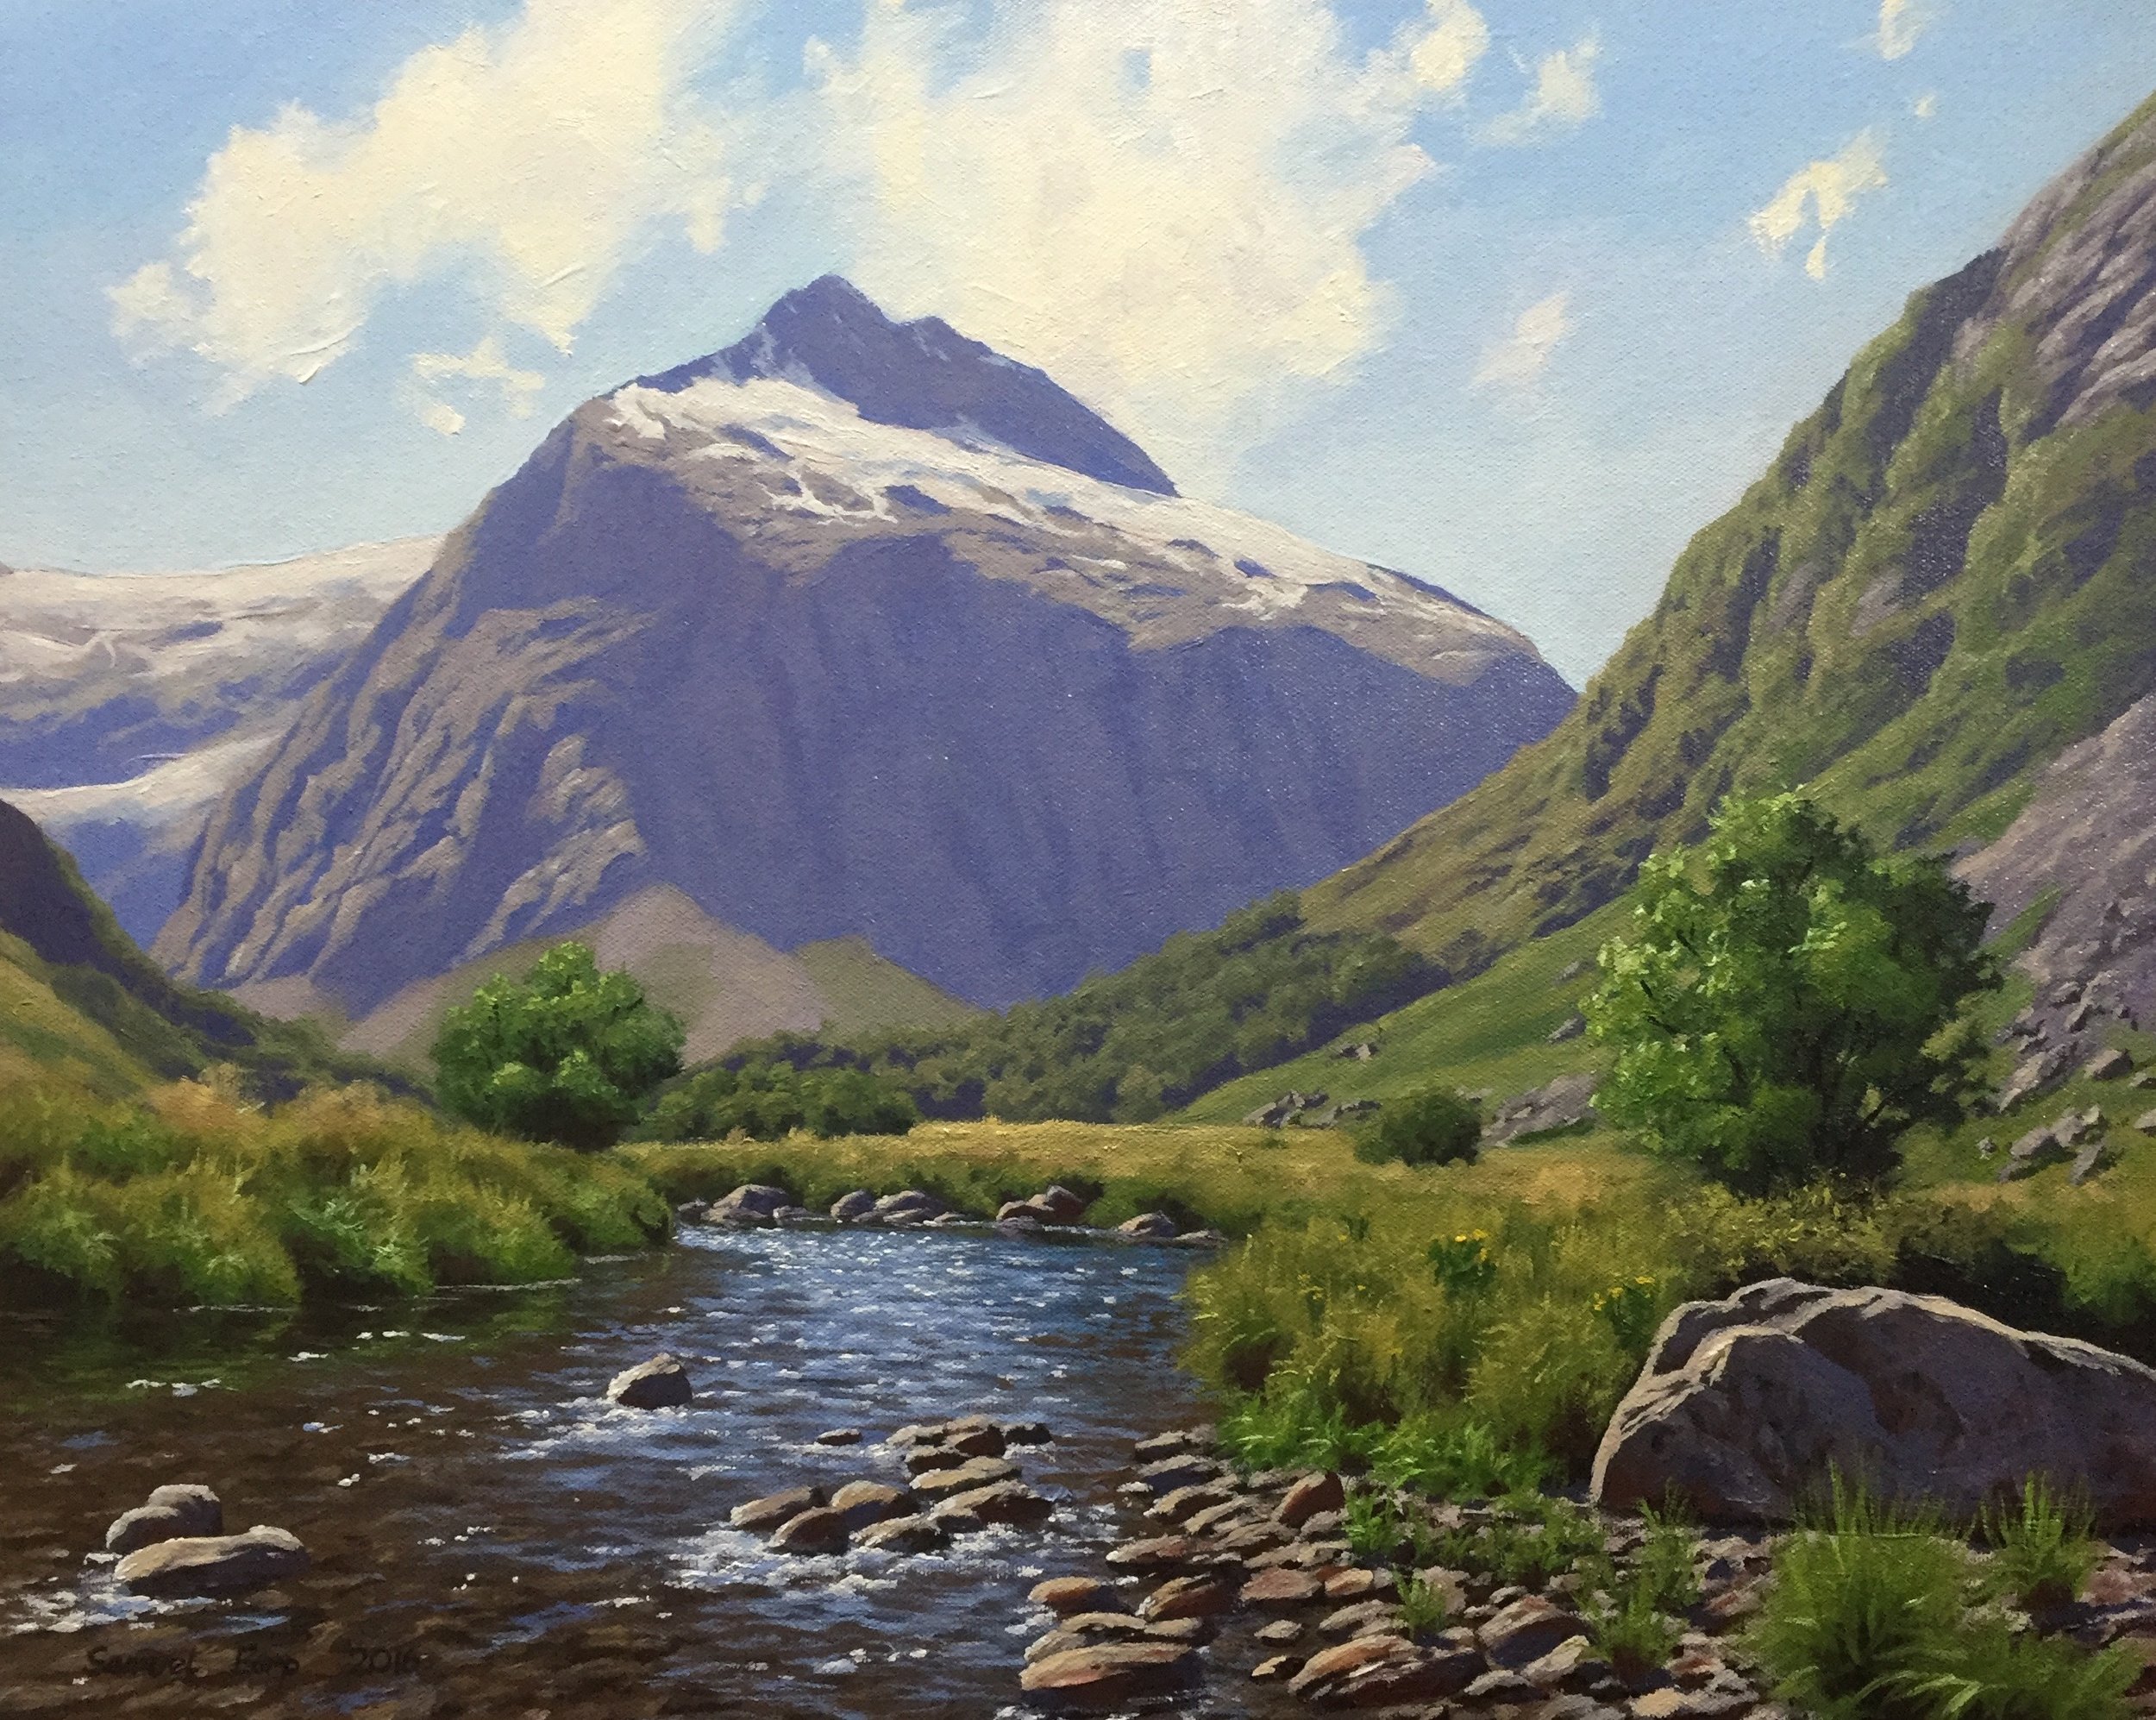
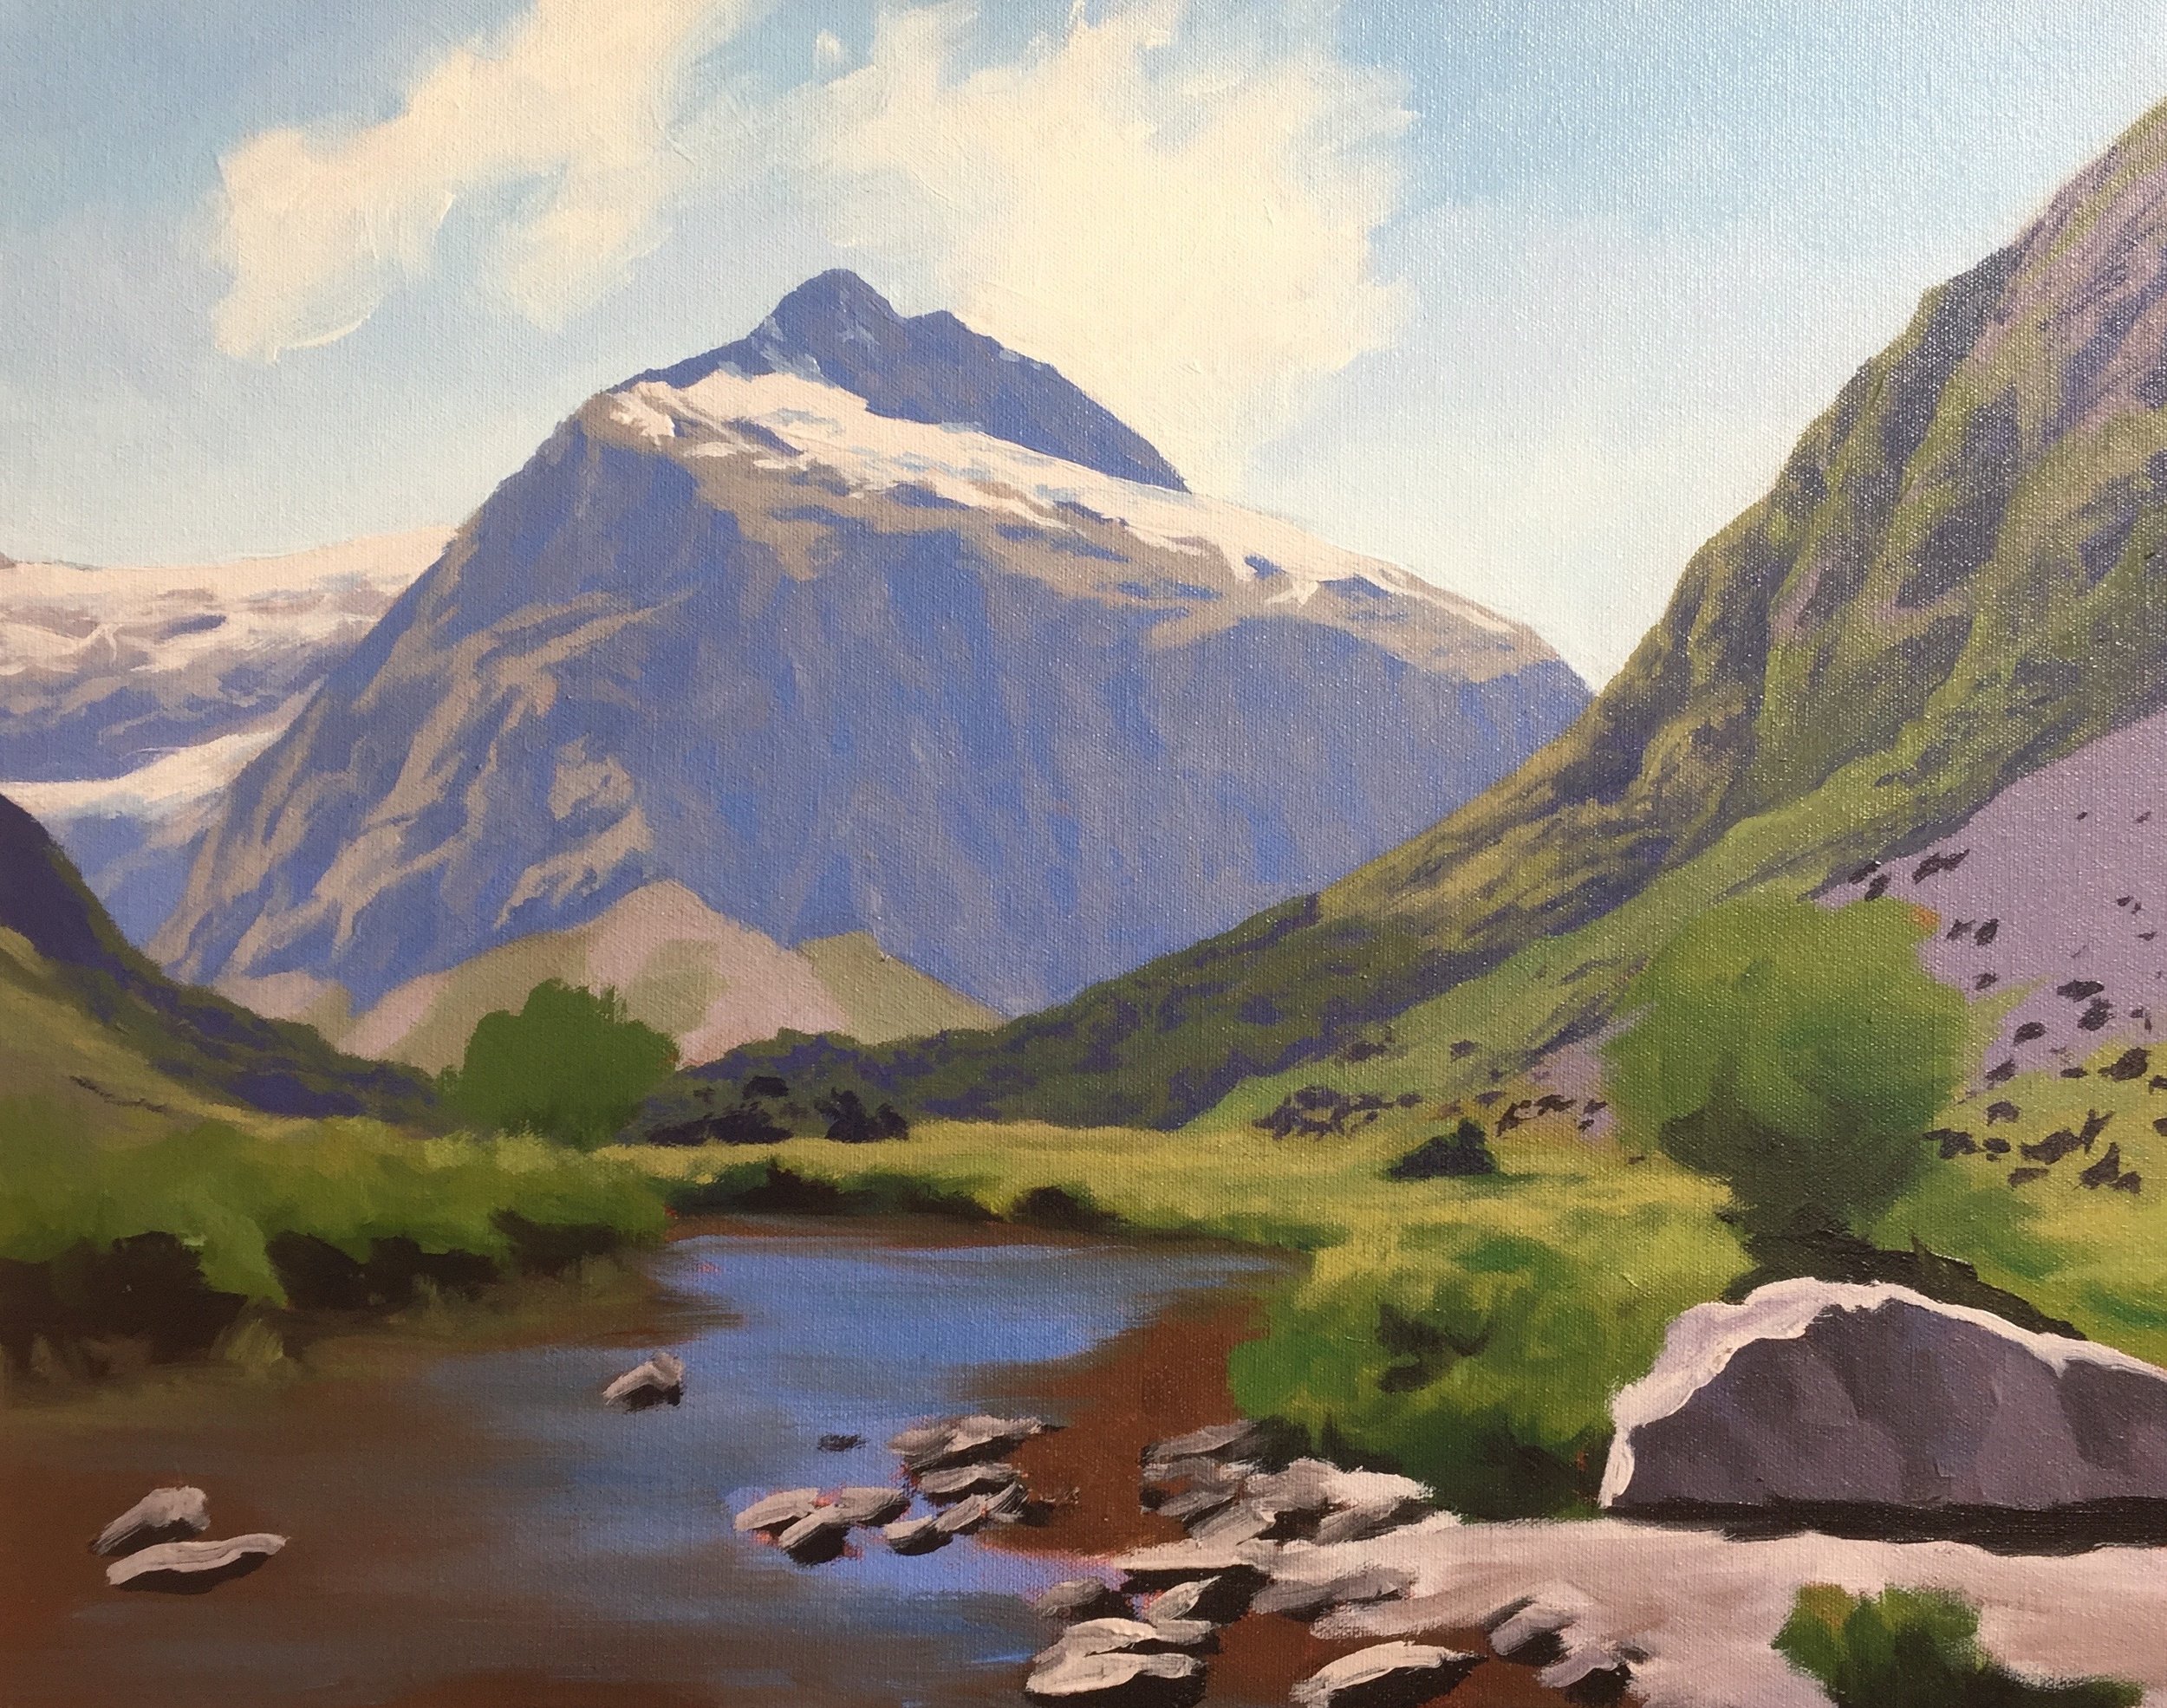
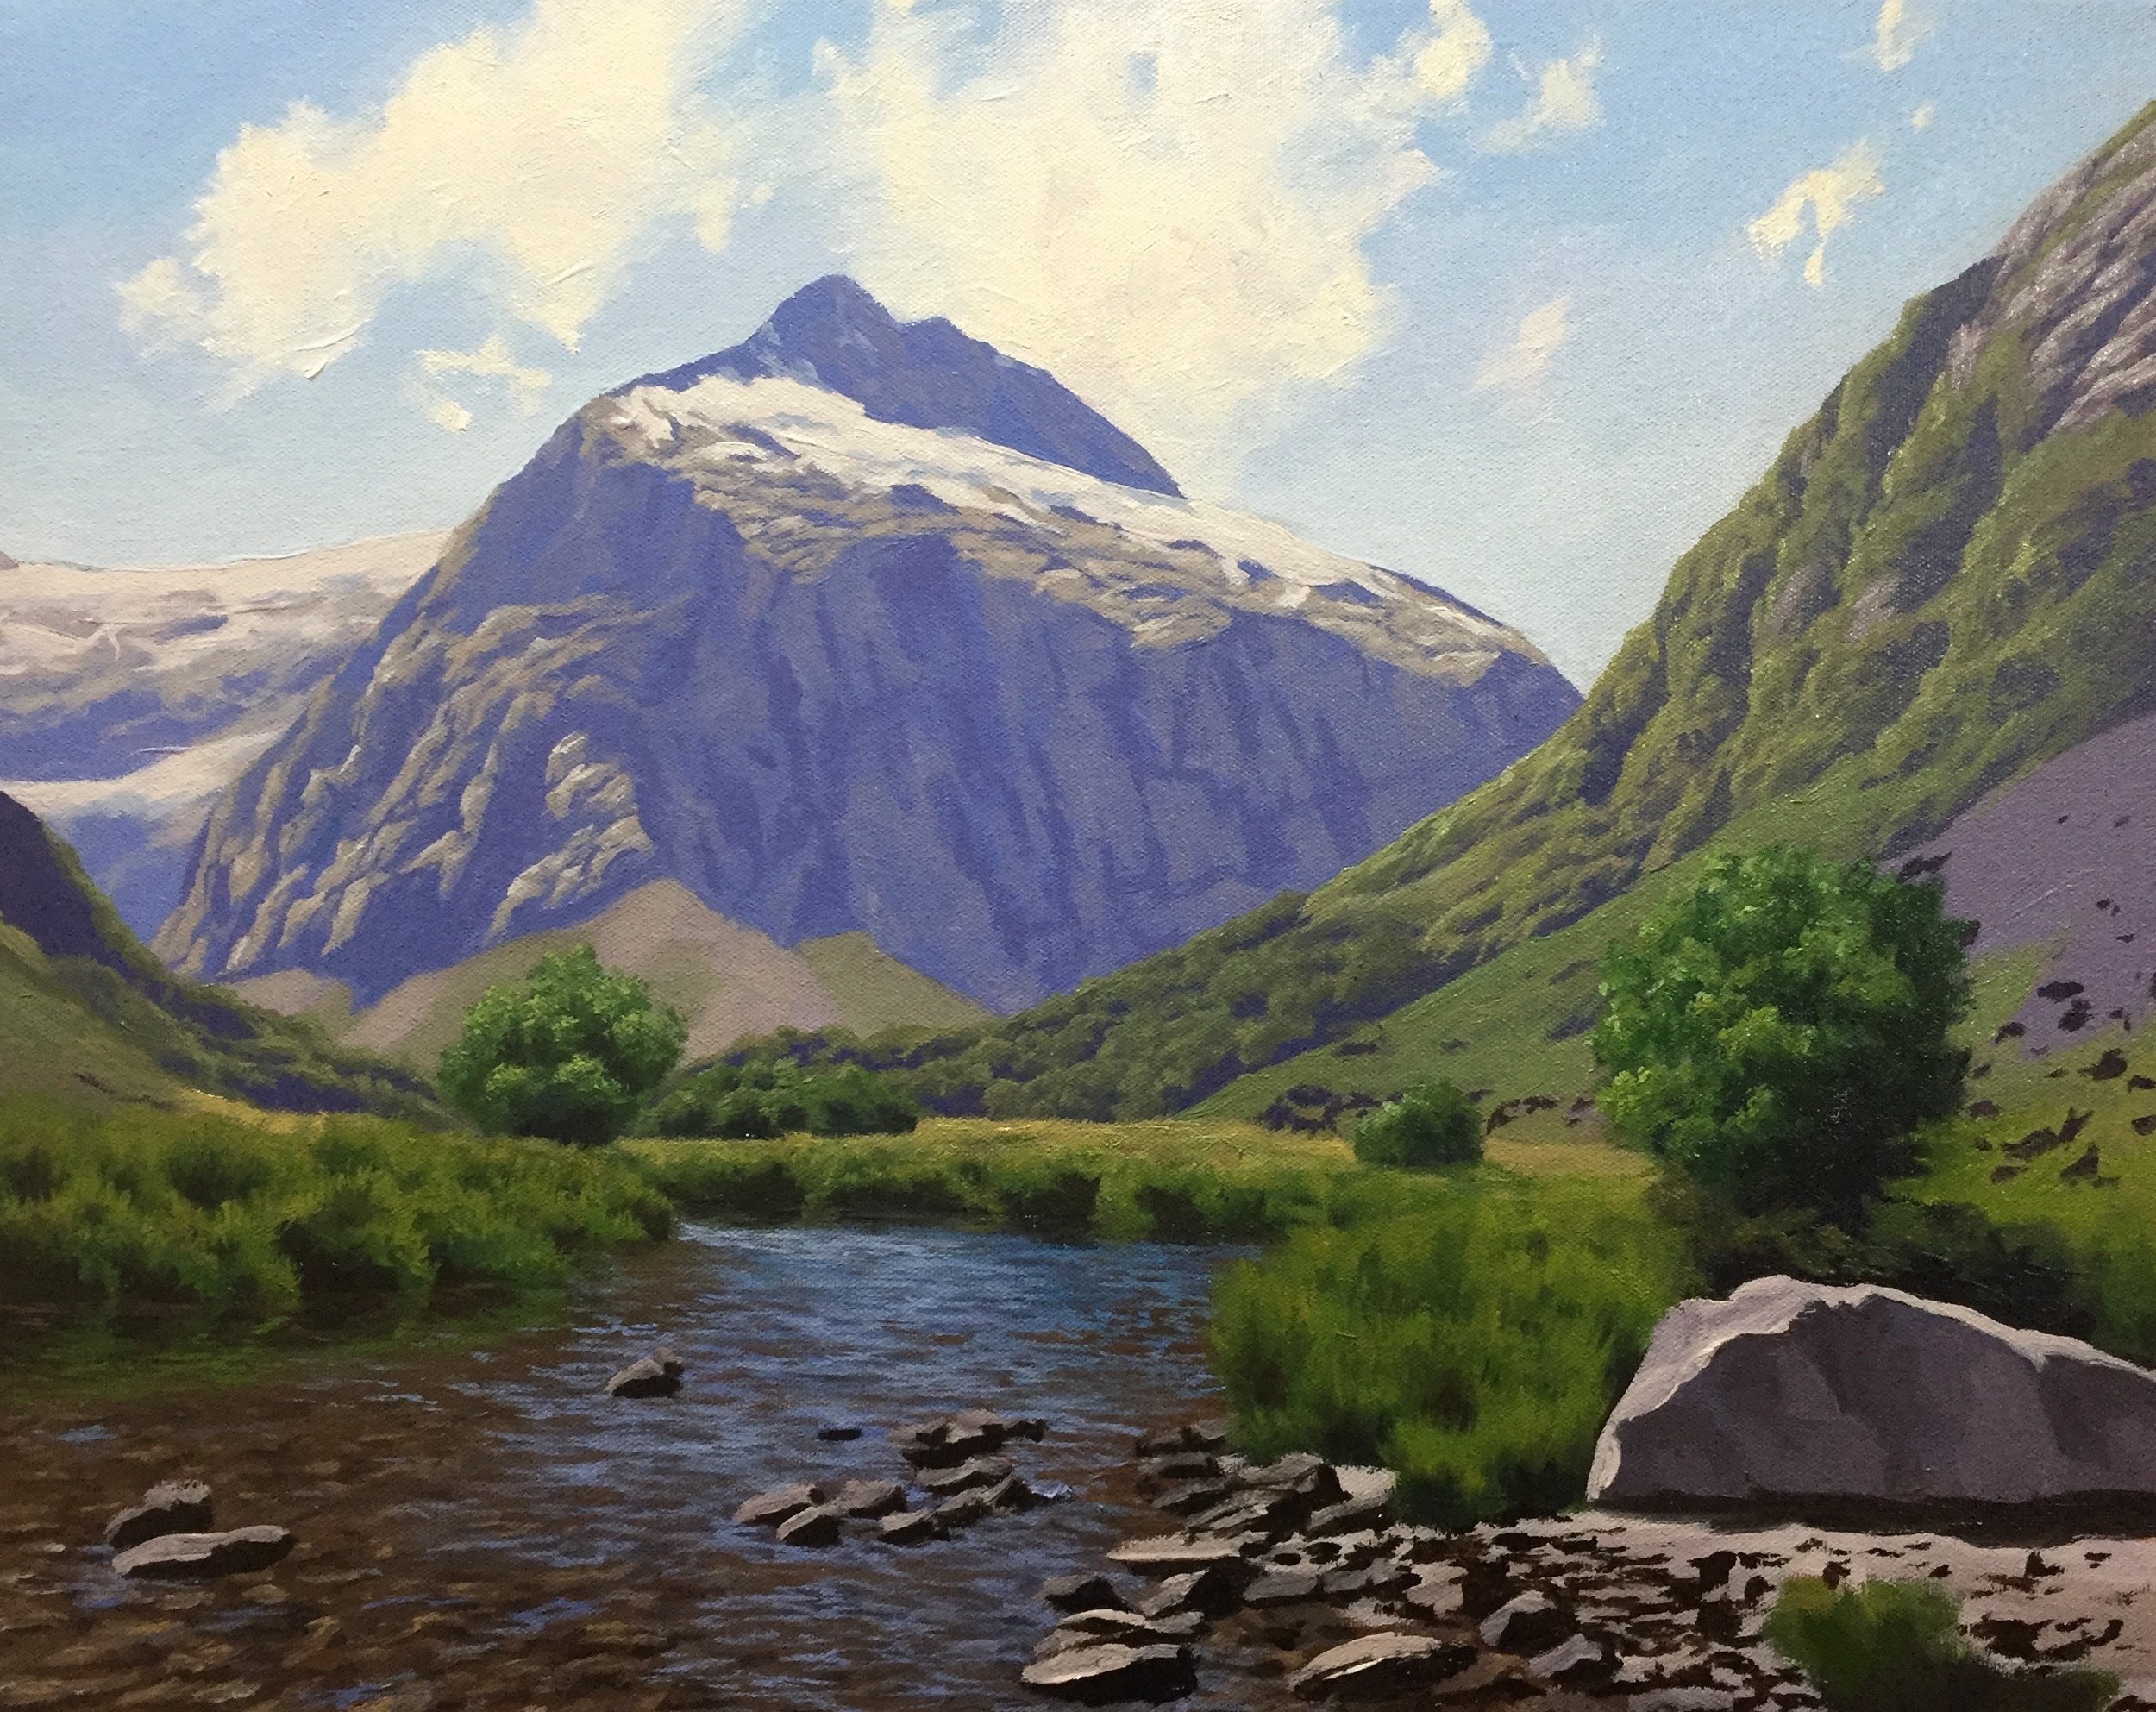
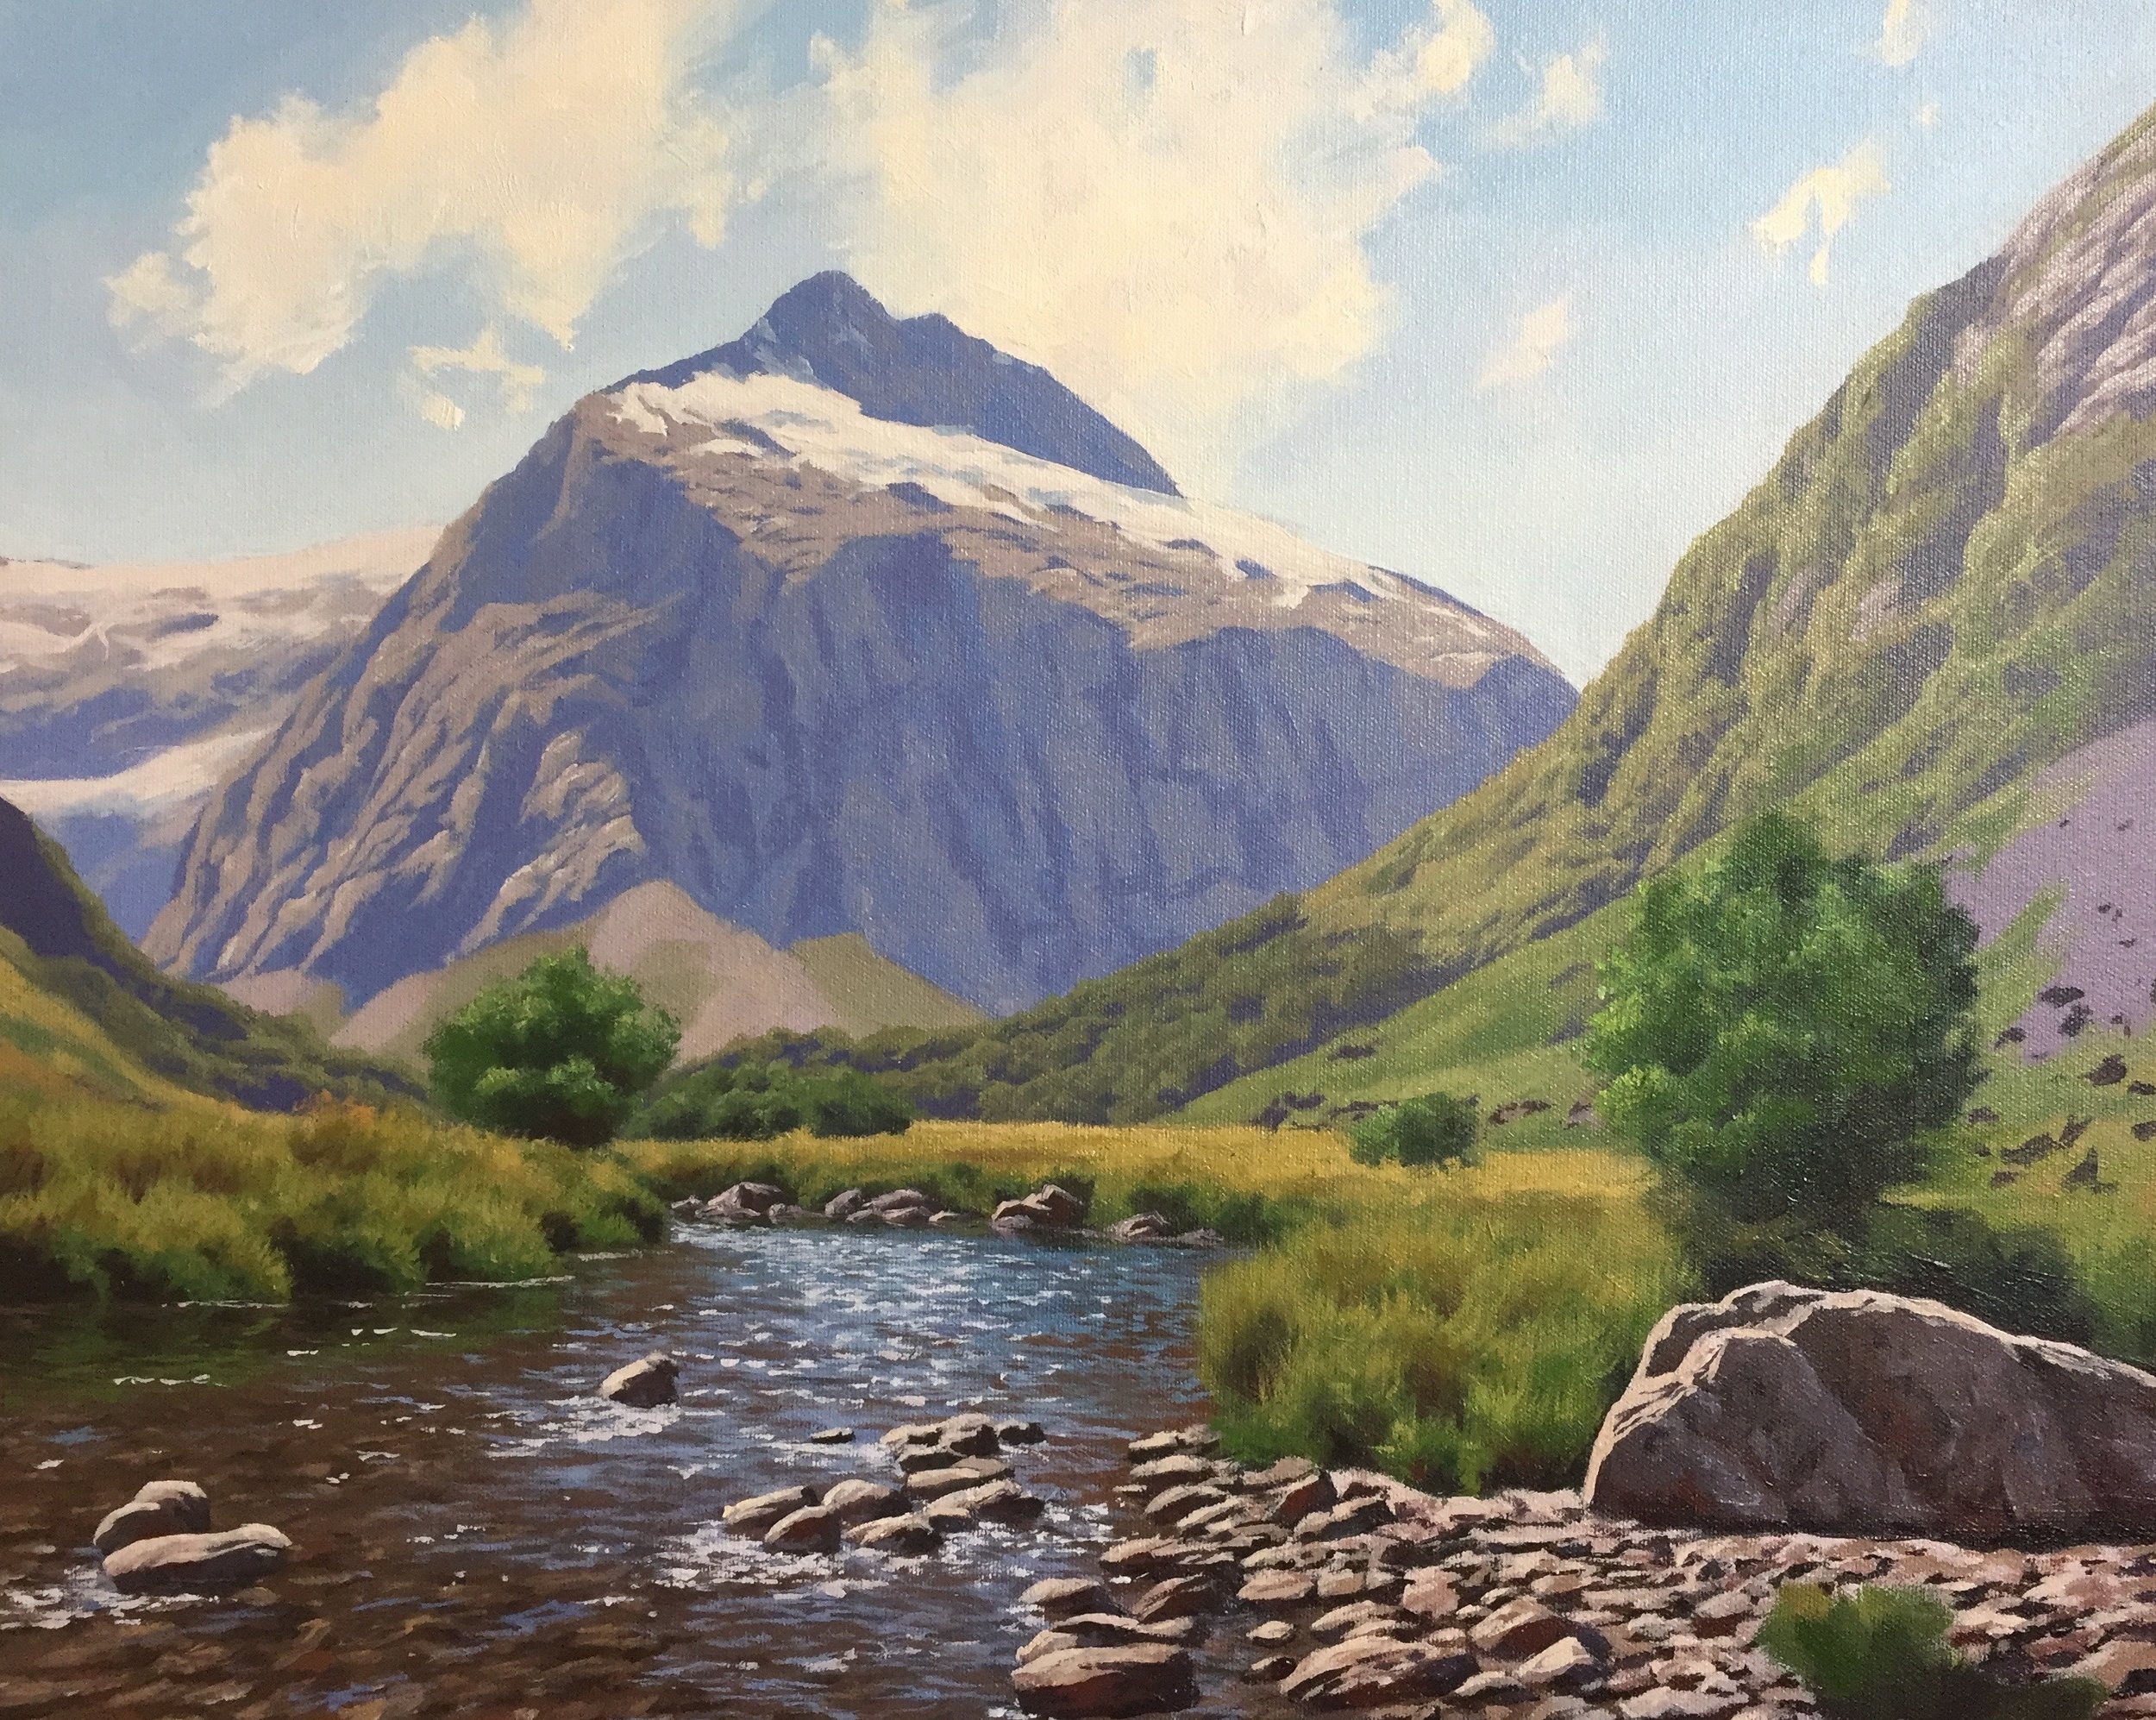
In this step-by-step painting demonstration, I am going to show you how to paint this mountain landscape as shown in the picture below. This landscape painting is based on Mount Talbot in Fiordland, New Zealand. It is a vast mountain range that ultimately leads to the epic Milford Sound; this is an excellent subject for landscape painting.
I love landscape art, especially traditional realism painting and I have been painting landscapes for many years. Many of my influences come from 19th Century landscape painters, my favorite artists include Peder Mork Monsted, August Wilhelm Leu, Ivan Shishkin, and Even Ulving to name a few.
From the low chroma depth of the mountains in August Wilhelm Leu’s work to the natural organic vibrancy of the foliage in the works of Peder Mork Monsted, I love the way these guys composed their paintings and their use of color and tone. I look up to these guys for inspiration, and I seek to emulate their techniques for my own landscape paintings.
Planning the Painting
In order to create an engaging mountain landscape painting, first of all, we need to plan our picture to determine what the painting is about. Depth within a painting can be achieved by having strategically placed focal points and effective use of color to create atmosphere and space within the painting.
In order to create the story of this painting, I decided what elements I wanted in the scene and where I wanted my main focal point to be. Before I even began painting this picture, I compiled many pencil sketches in order to plan the composition so I could see what would work and what wasn’t going to work in the picture. This is essential so I don’t encounter problems with composition issues later on when I paint the picture.
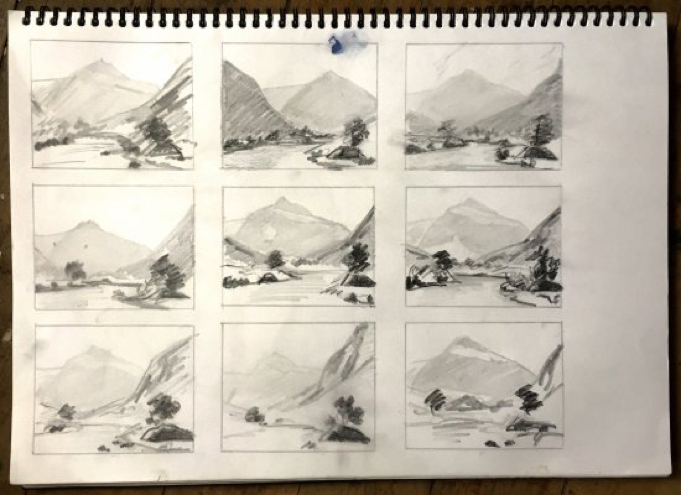
When compiling my sketches, I constantly think about my composition checklist to reduce or eliminate elements that could ruin the composition. Common compositional errors in landscape painting can include center lines or focal points placed in the center of the picture, aberrations and repeating objects, shapes, and vectors and/or too much information. Many times in landscape painting less is more so it’s often a good idea to simplify the painting, especially in terms of composition.
Creating the Composition
Below is one of the reference photos I used to paint this scene.
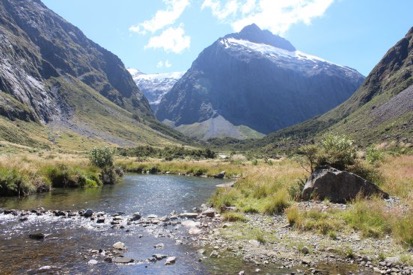
The photo contains all the elements required to create a great painting; however, the composition doesn’t quite work in its current form. Mount Talbot in relation to the river, is cumbersome and distracting as the river leads the eye away from the mountain.
The horizon is in the center of the photo, and there is a distracting vector in the form of the horizontal line of stones across the river. This is where sketching is a vital part of the painting process, as it is necessary to rearrange the elements of this photo to create a much more pleasing composition.
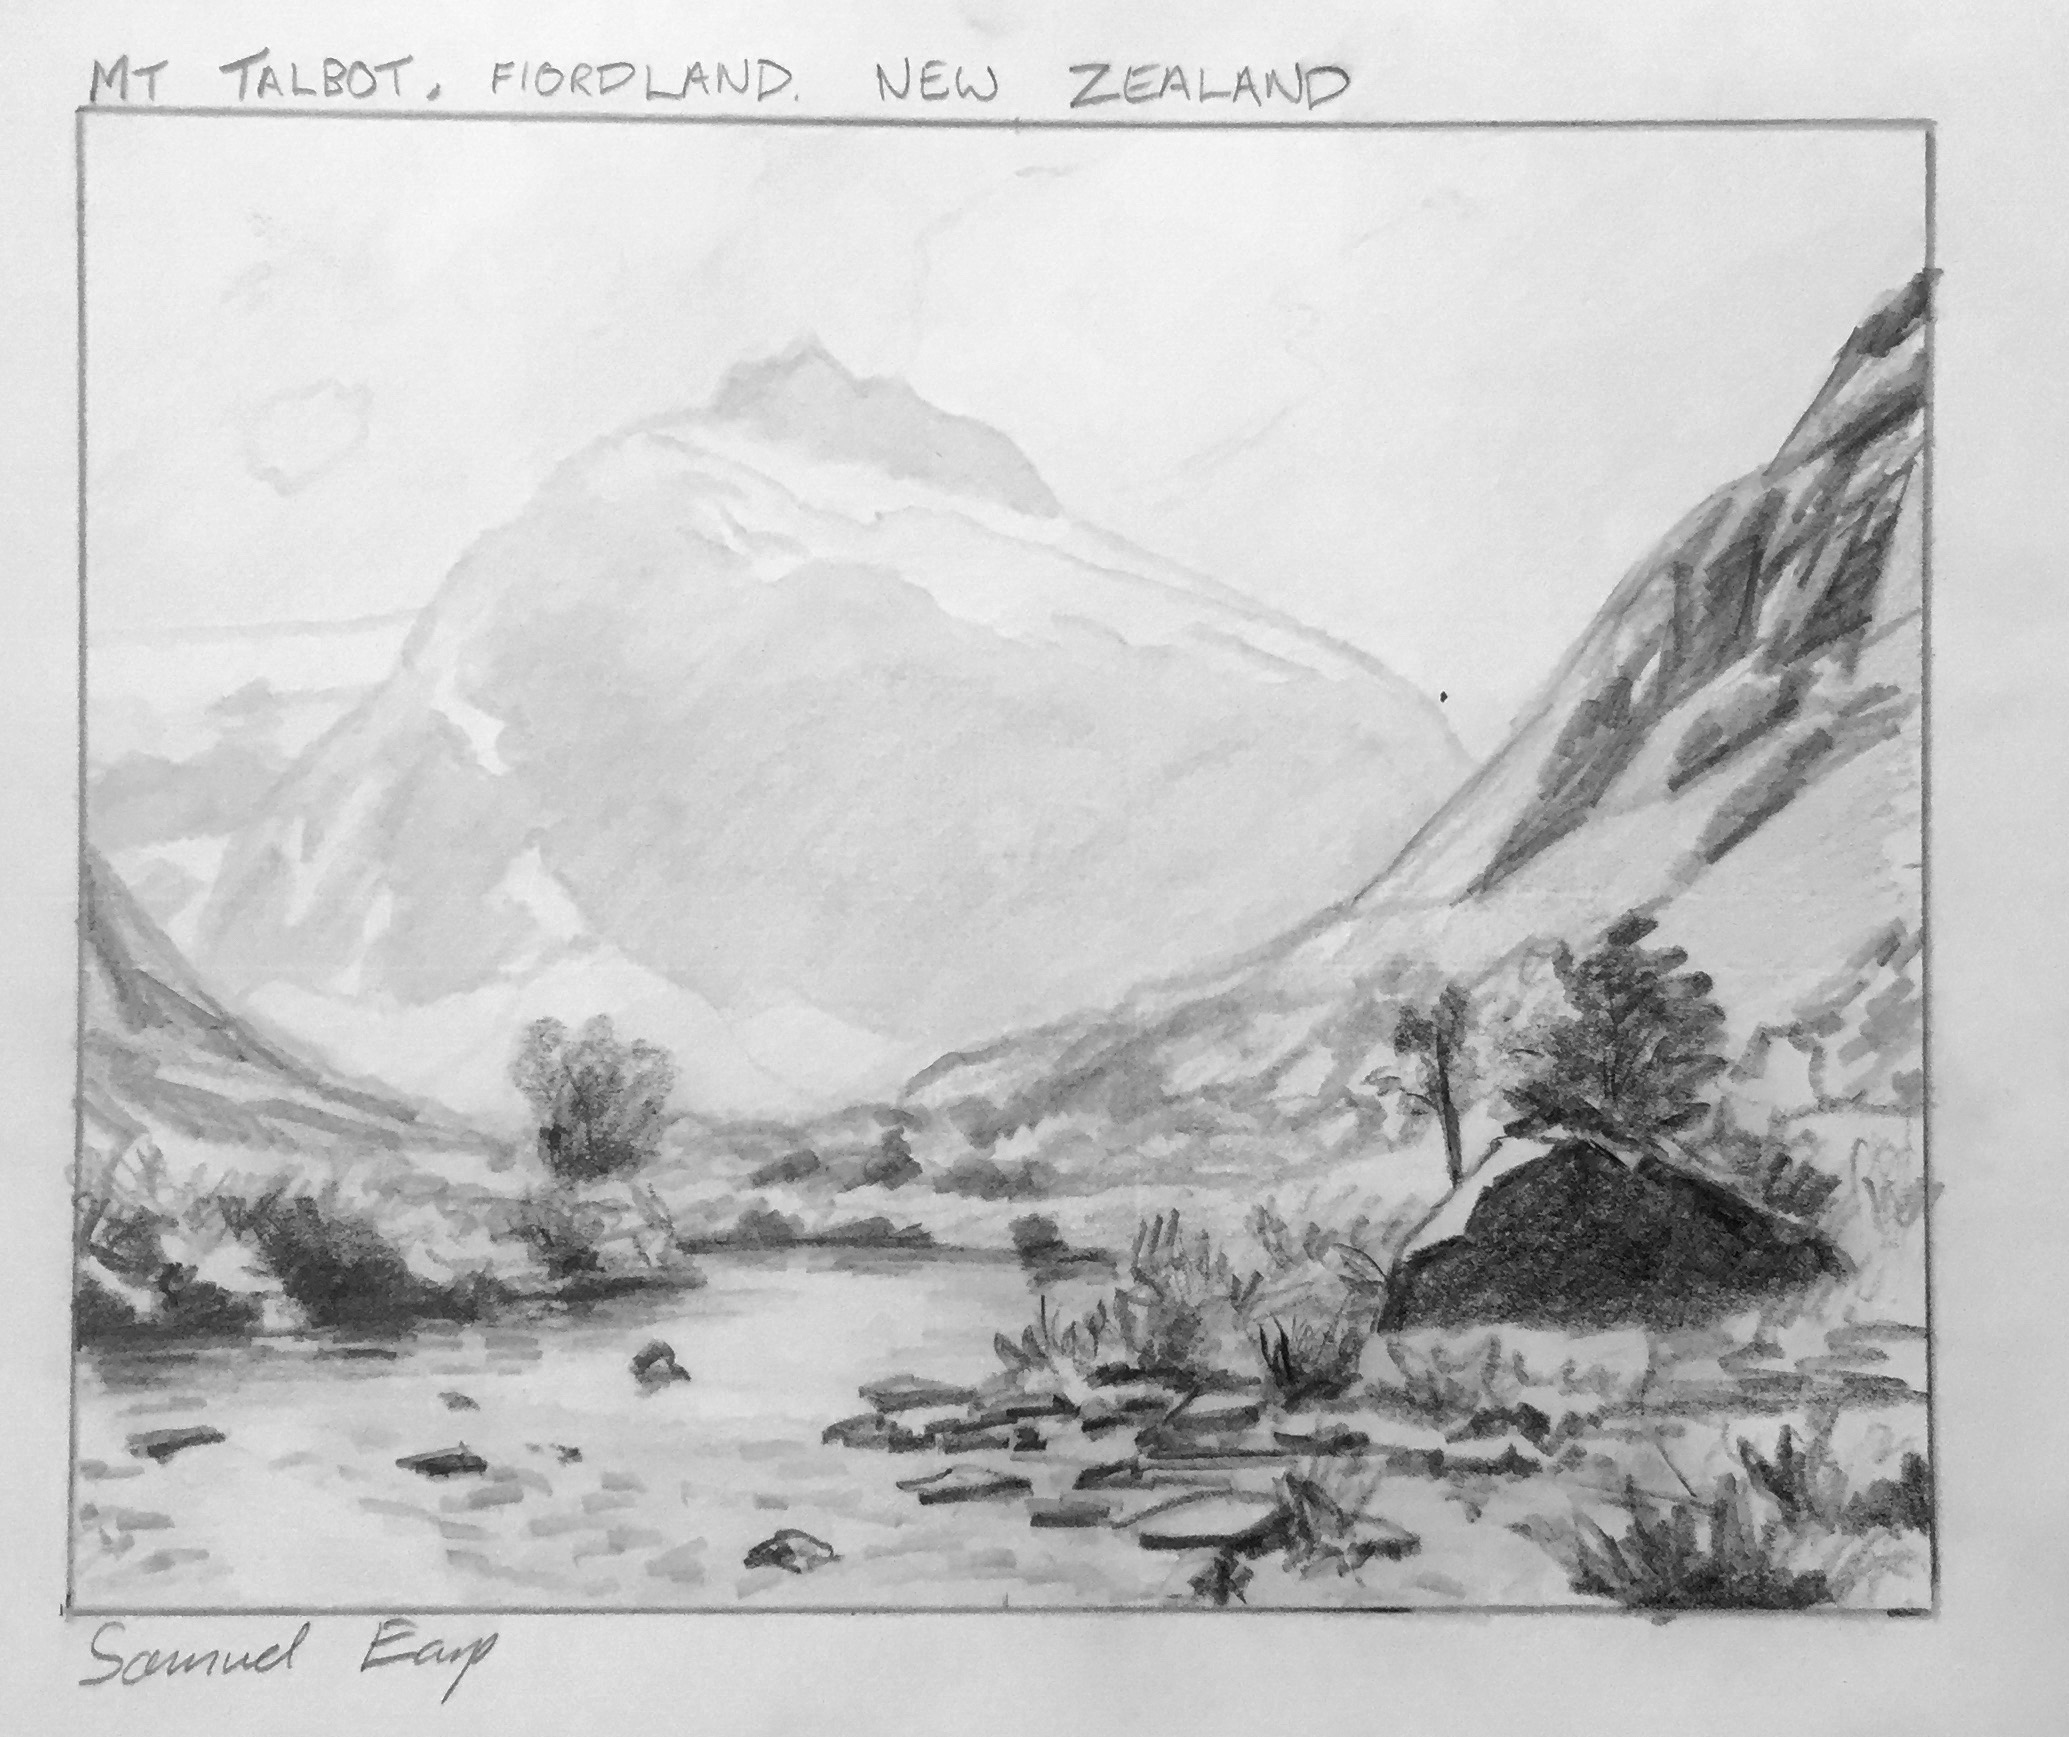
In this painting, I have moved Mount Talbot (the focal point) to the left side of the picture and I have made it more prominent. I have lowered the horizon and reshaped the river so it leads towards the mountain. I have removed the line of stones in the water and made some of the bushes and plants bigger.
My Palette
I painted this artwork using oil paint, and the colors I used in this painting are as follows:
Titanium white
Cadmium yellow
Cadmium yellow deep
Yellow oxide
Burnt sienna
Burnt umber
Cadmium red light
Quinacridone magenta
Ultramarine blue
Thalo blue
Cobalt blue
Cobalt teal
Thalo green
I have also used the medium Liquin Original which improves the flow of the paint and speeds up the drying time.
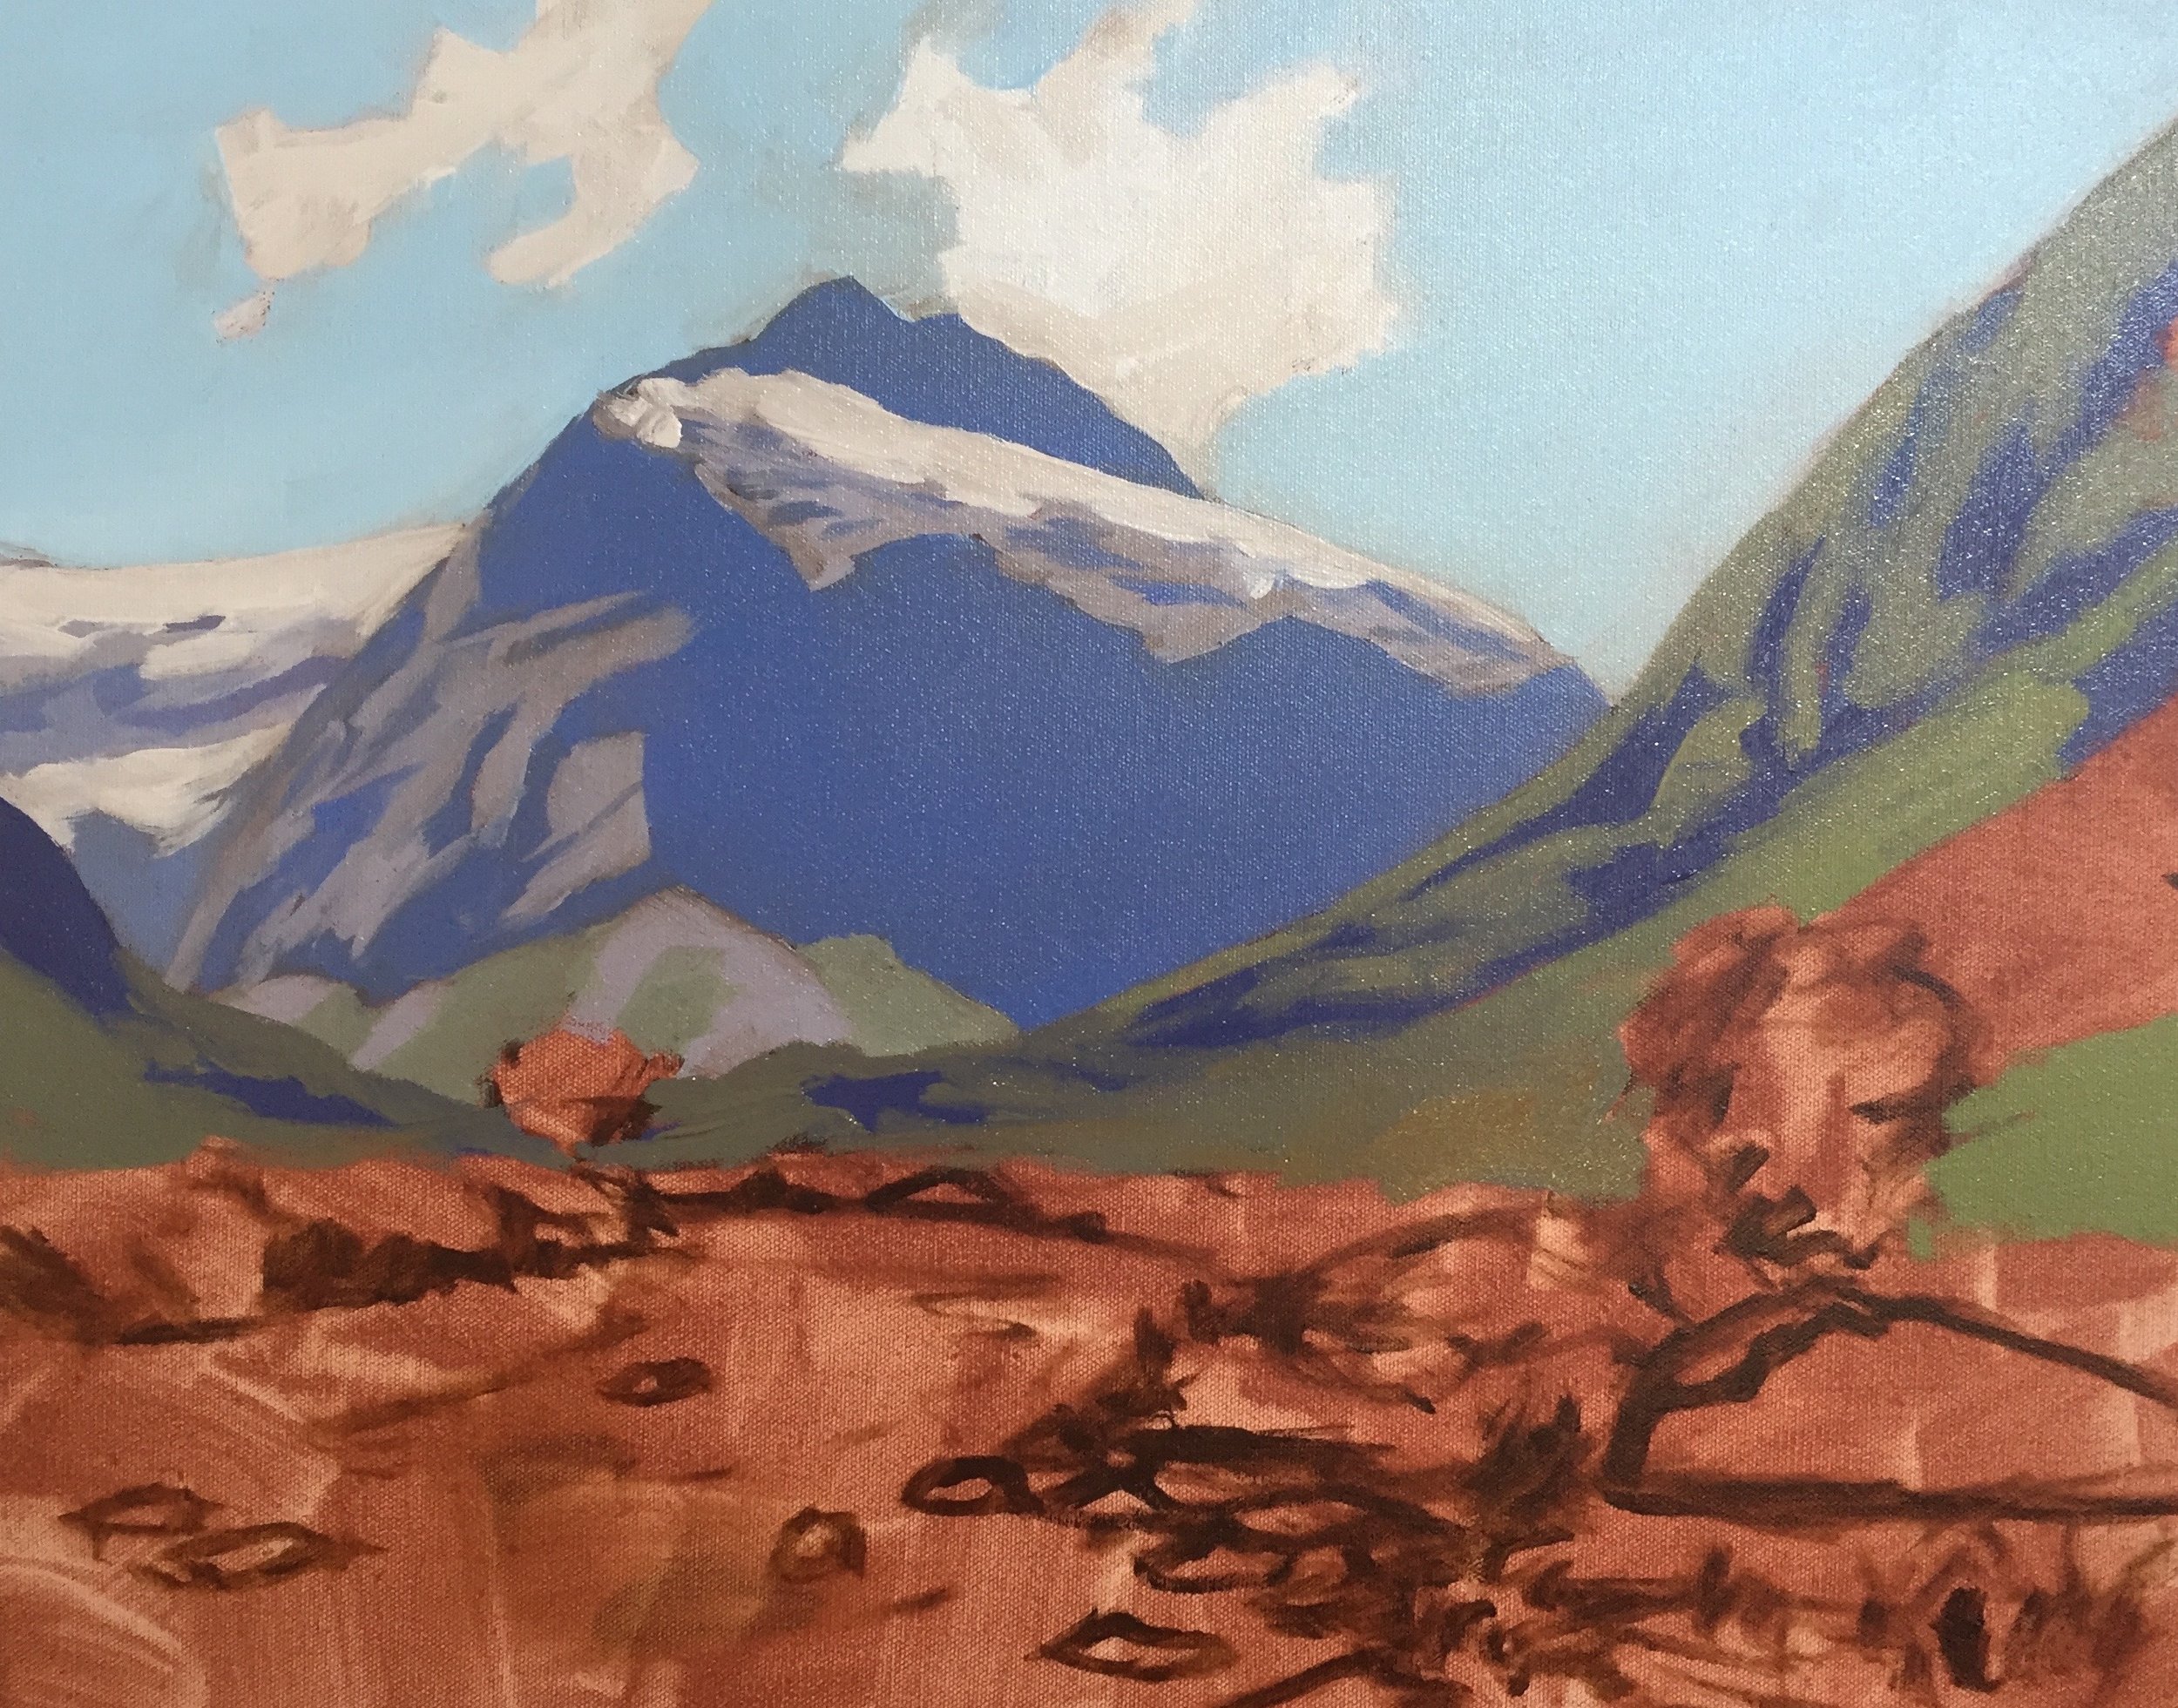
Painting Mount Talbot – Step by Step
Step 1
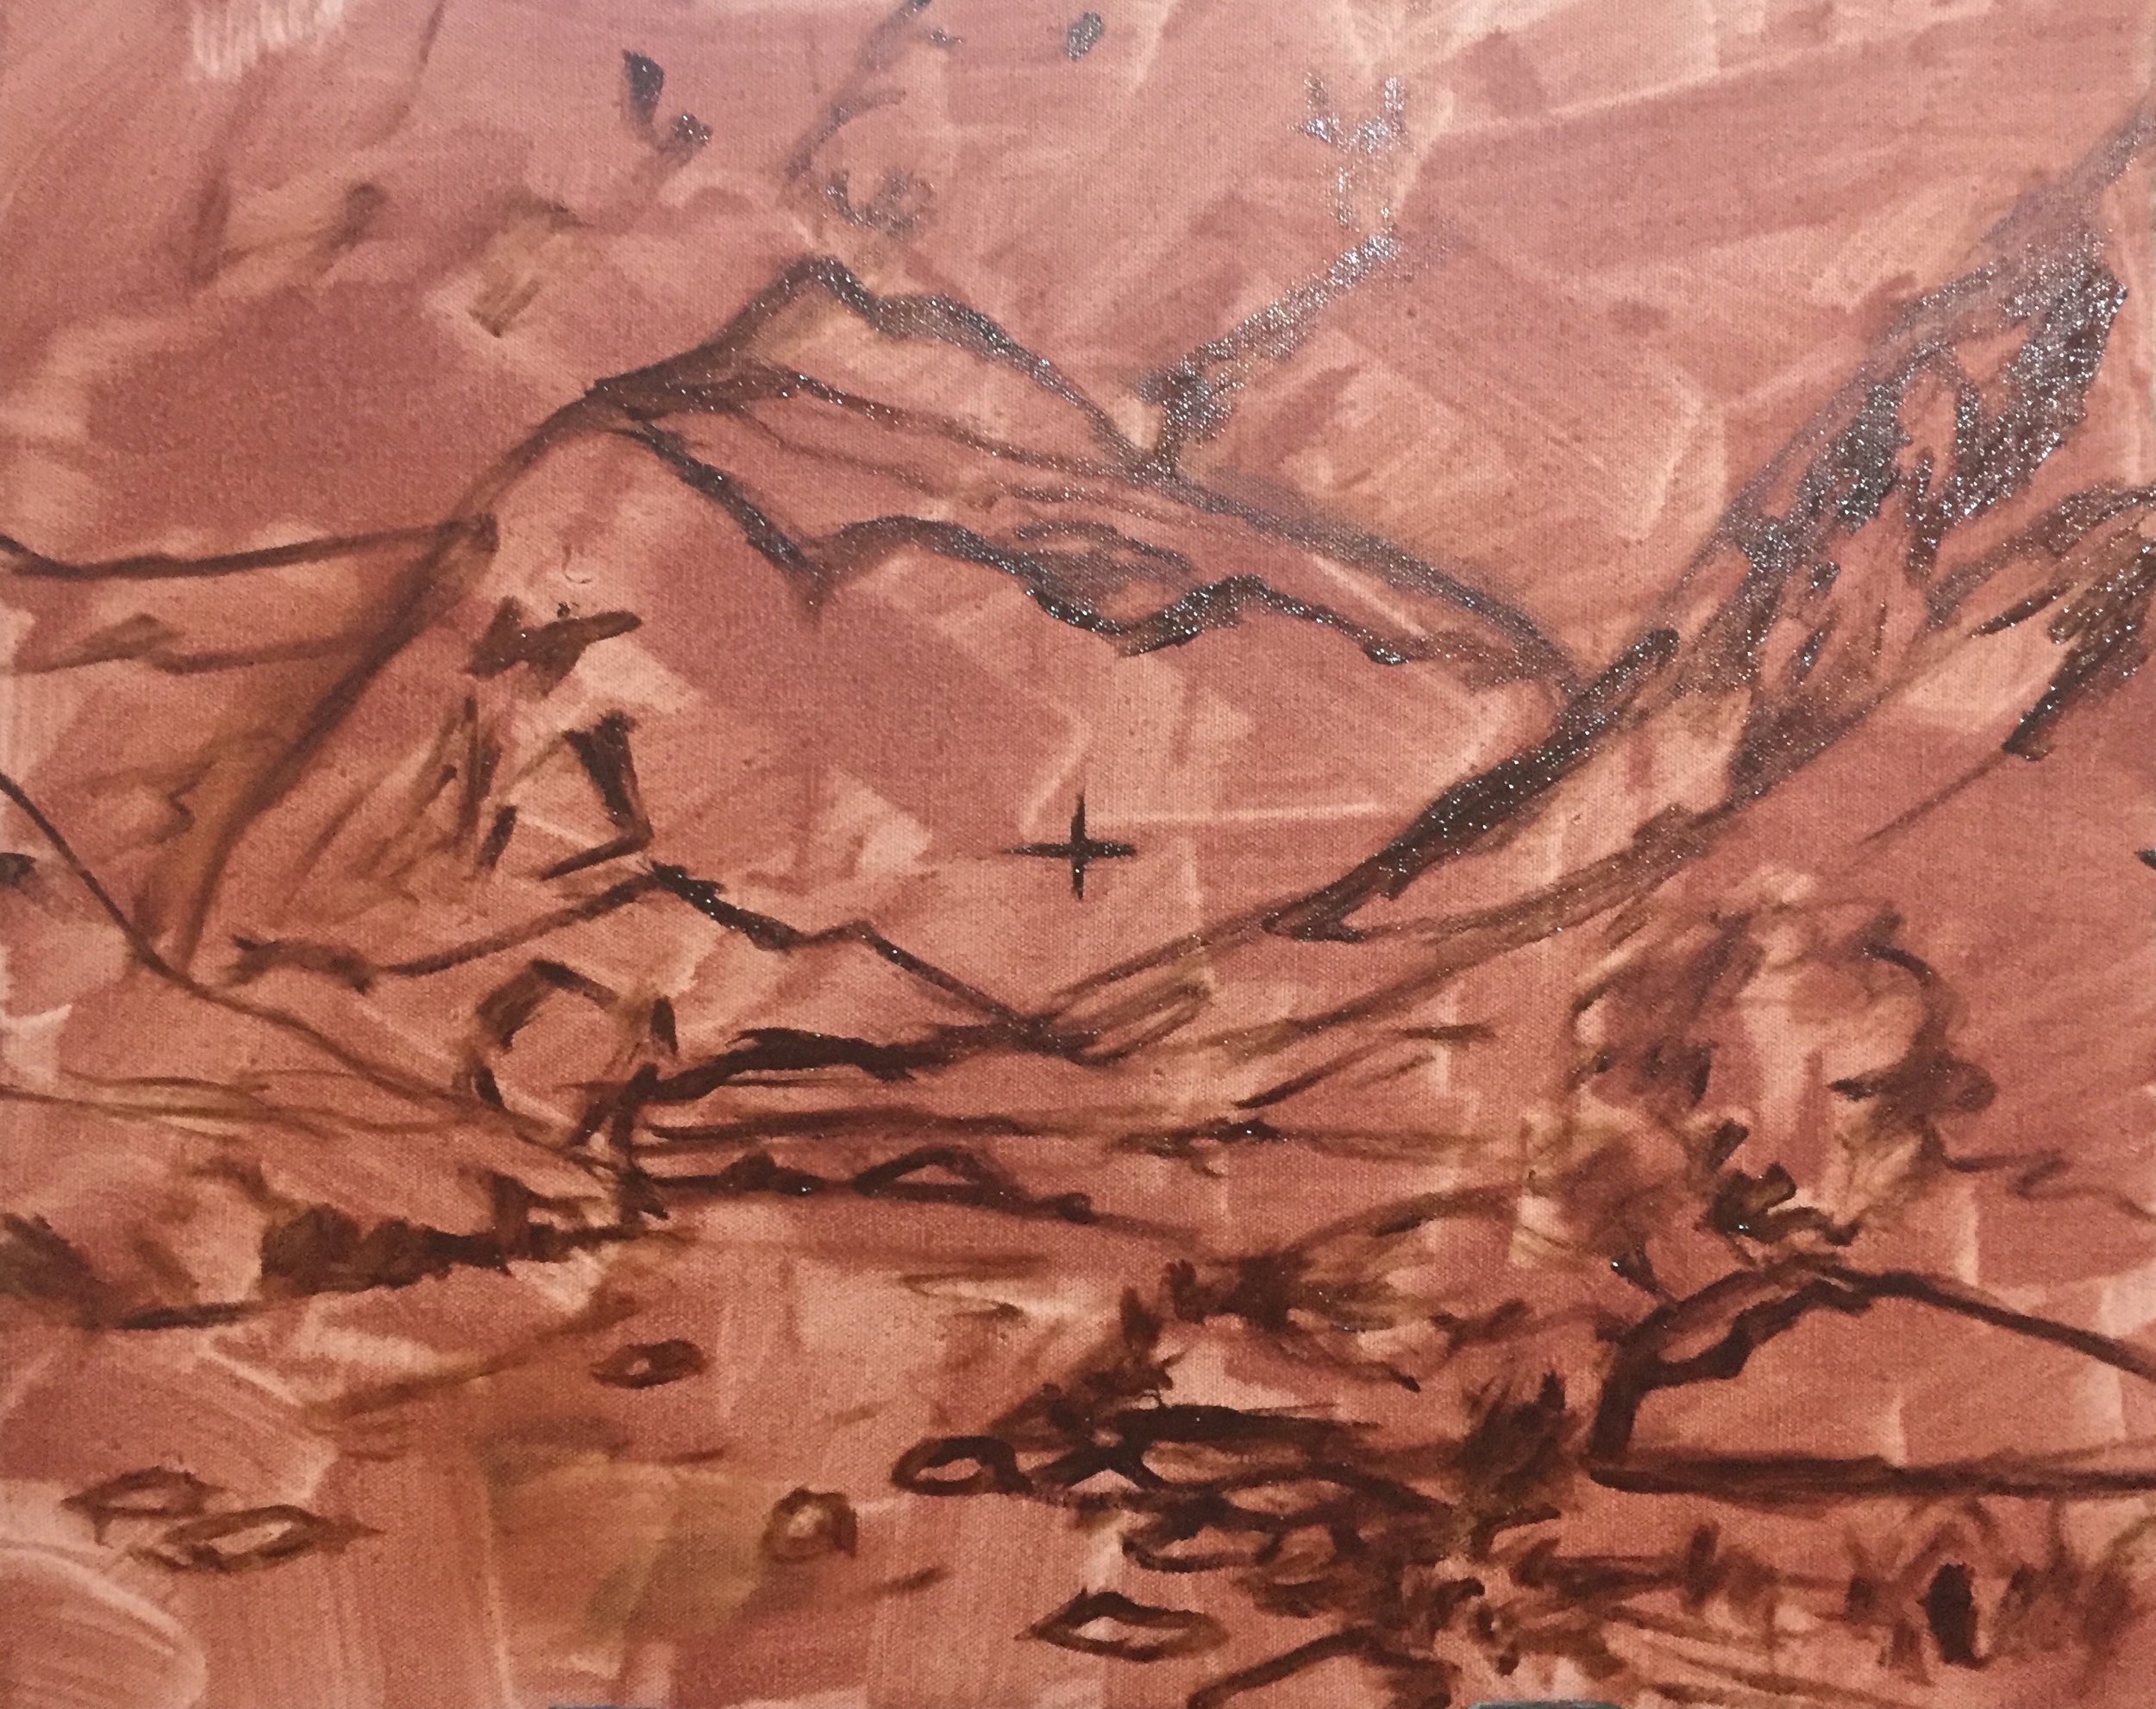
Prior to starting this painting, I prepared the canvas by covering it in a layer of burnt sienna. Adding a layer of burnt sienna gives the painting vibrancy as it comes through the layers of paint, and warms up the whole painting. You can also use burnt umber.
To prepare the canvas with the burnt sienna layer I mixed burnt sienna with Liquin. I then applied it to the canvas with a large hake brush making sure that the mixture is applied in a thin layer. I usually leave it to dry for at least a couple of days before starting a painting.
I have sketched the scene with burnt umber mixed with Liquin.
Step 2
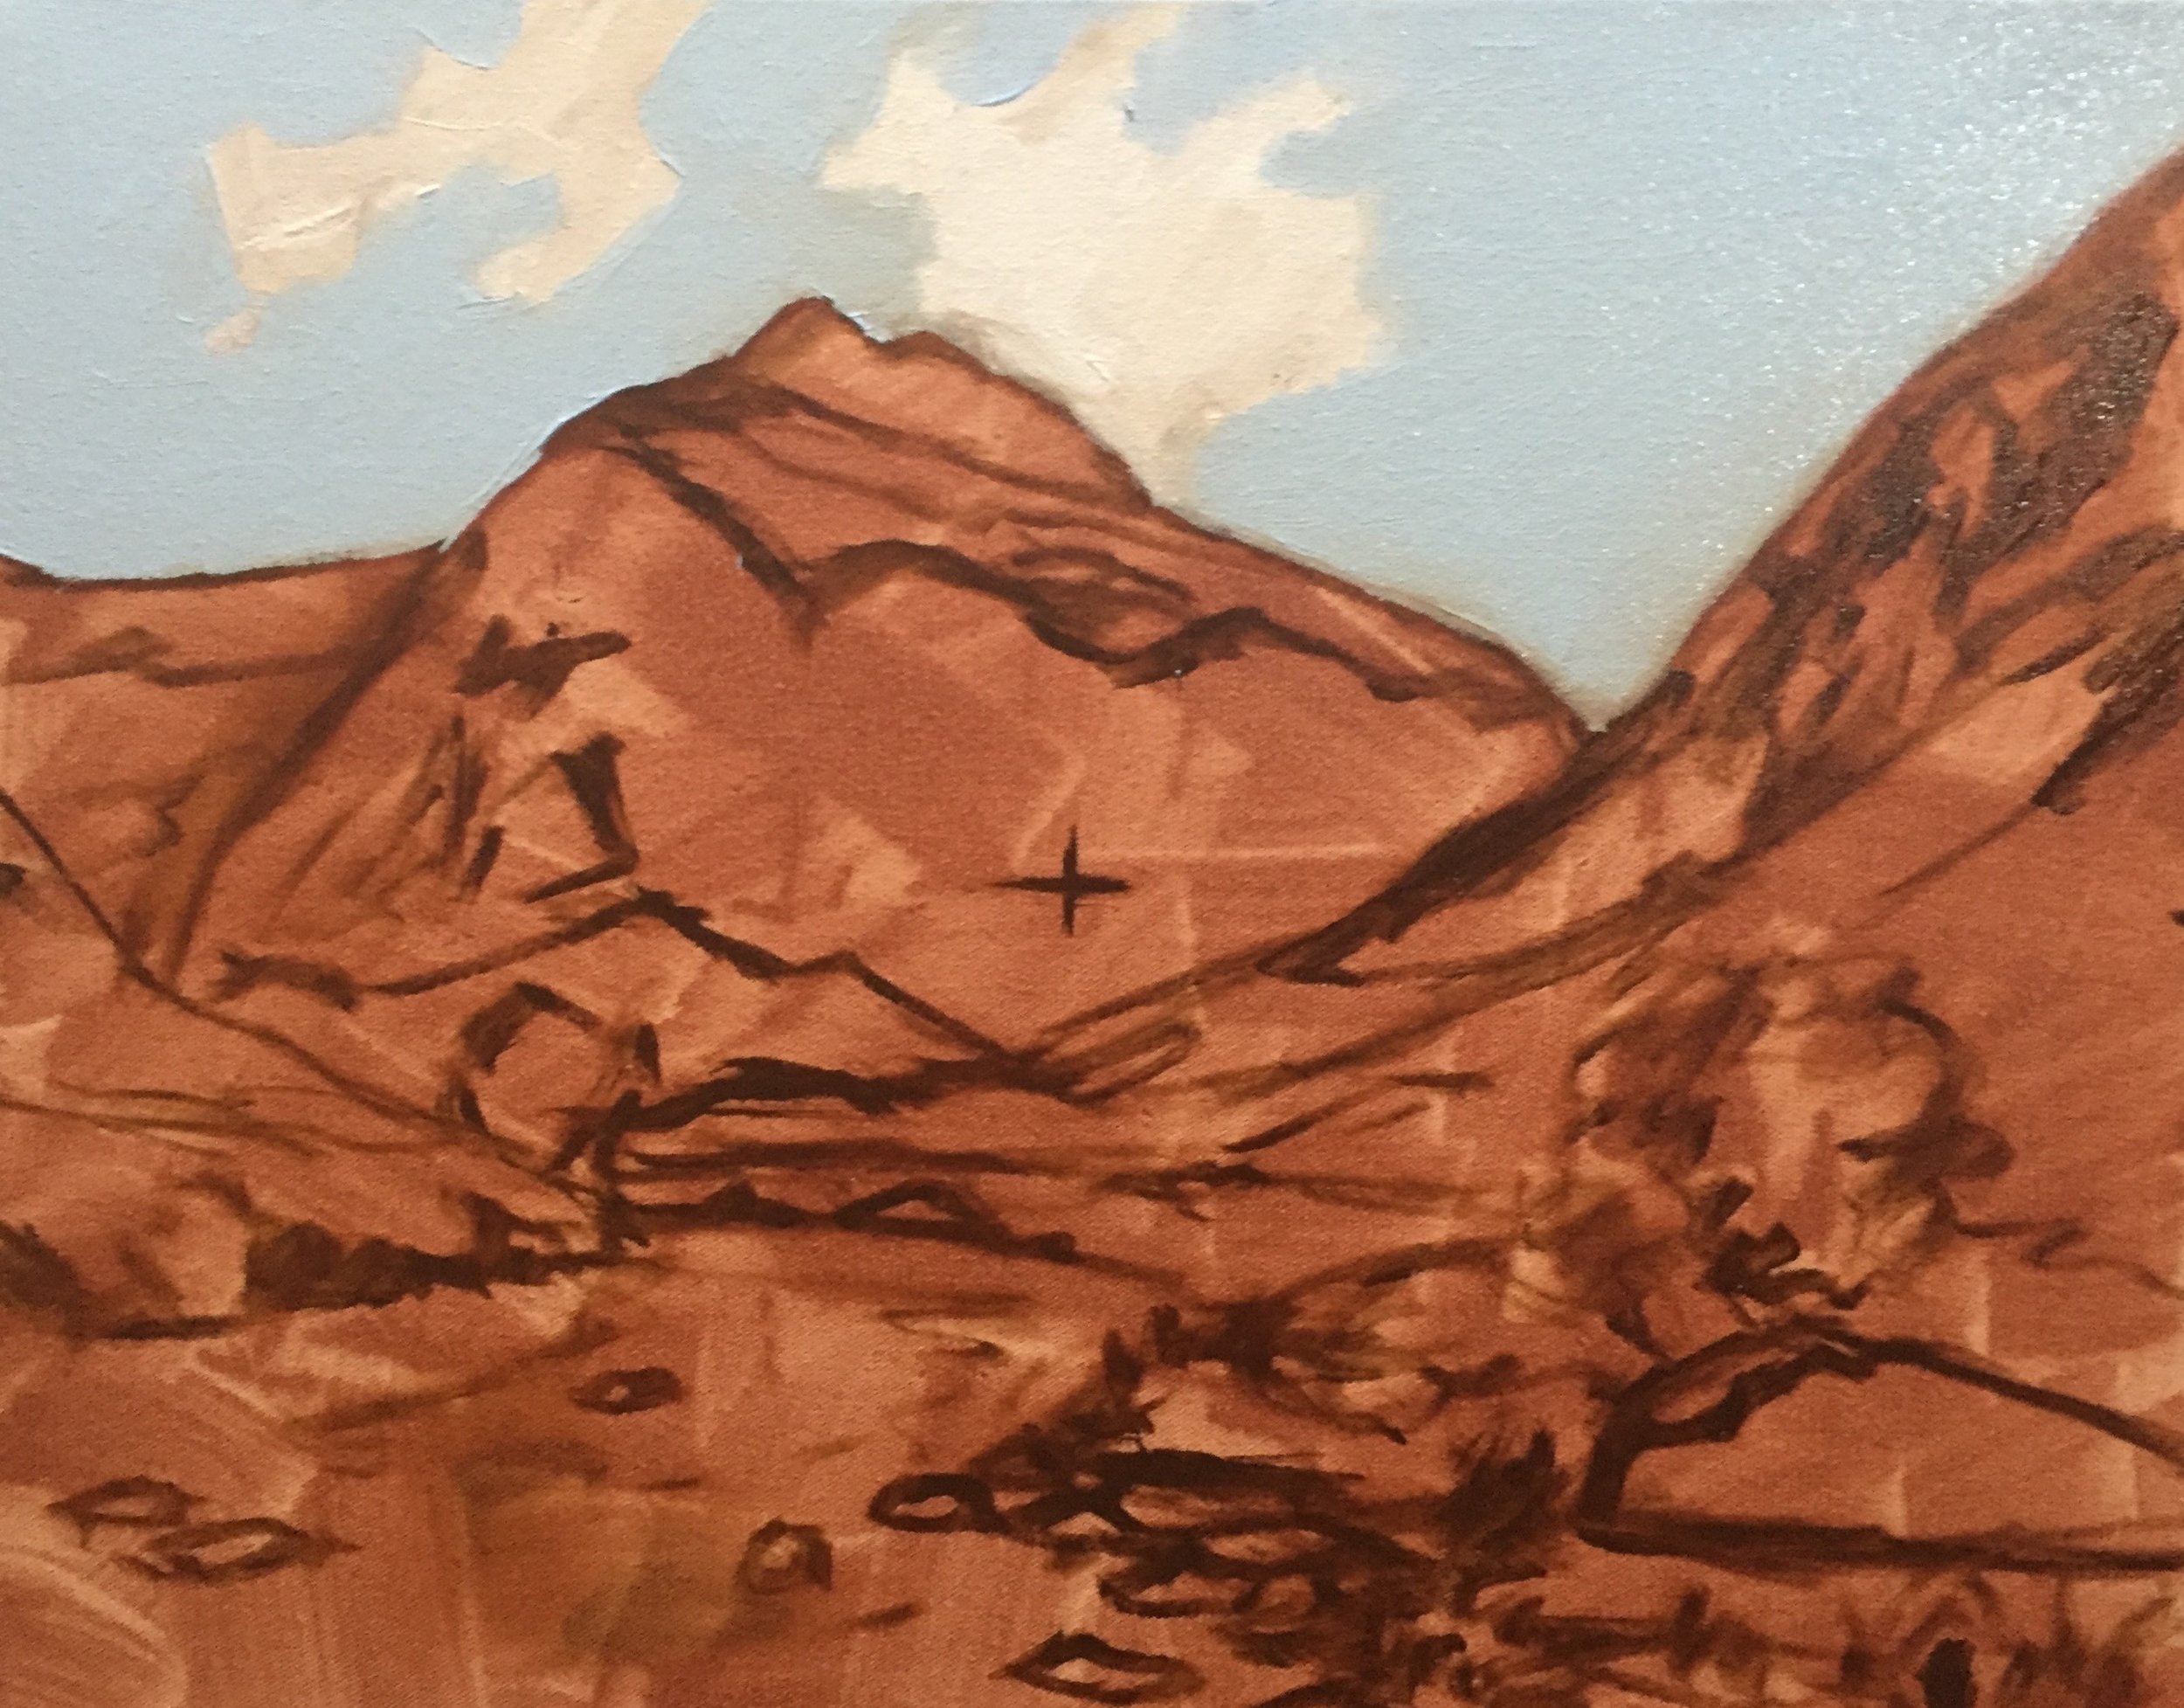
As I begin blocking in the painting I have started painting the sky which sets the overall scene for the picture. I will use the sky to gauge my tonal values in the rest of the painting. The blue of the open sky is mixed with a combination of cobalt blue, cobalt teal and titanium white. I have blocked in the basic shapes of the clouds using titanium white, once dry I will start building up the detail.
Step 3
I start blocking in the shadow areas of Mt Talbot. This is the most distant landmass, so the colors will not be so vibrant and much more desaturated. Tonally, there is a smaller gap on the scale between the darkest values in the shadow areas and the highlighted areas that are in full sun and this needs to be reflected in the painting to create depth. So I mix ultramarine blue, burnt umber, quinacridone magenta and titanium white.
The burnt umber, of which you’ll need a small amount, knocks out the saturation of the blue. Adding a small amount of quinacridone magenta adds another dimension to the color and will give it a warm violet tint. Be care not to use too much quinacridone magenta as it will quickly overpower the mixture.
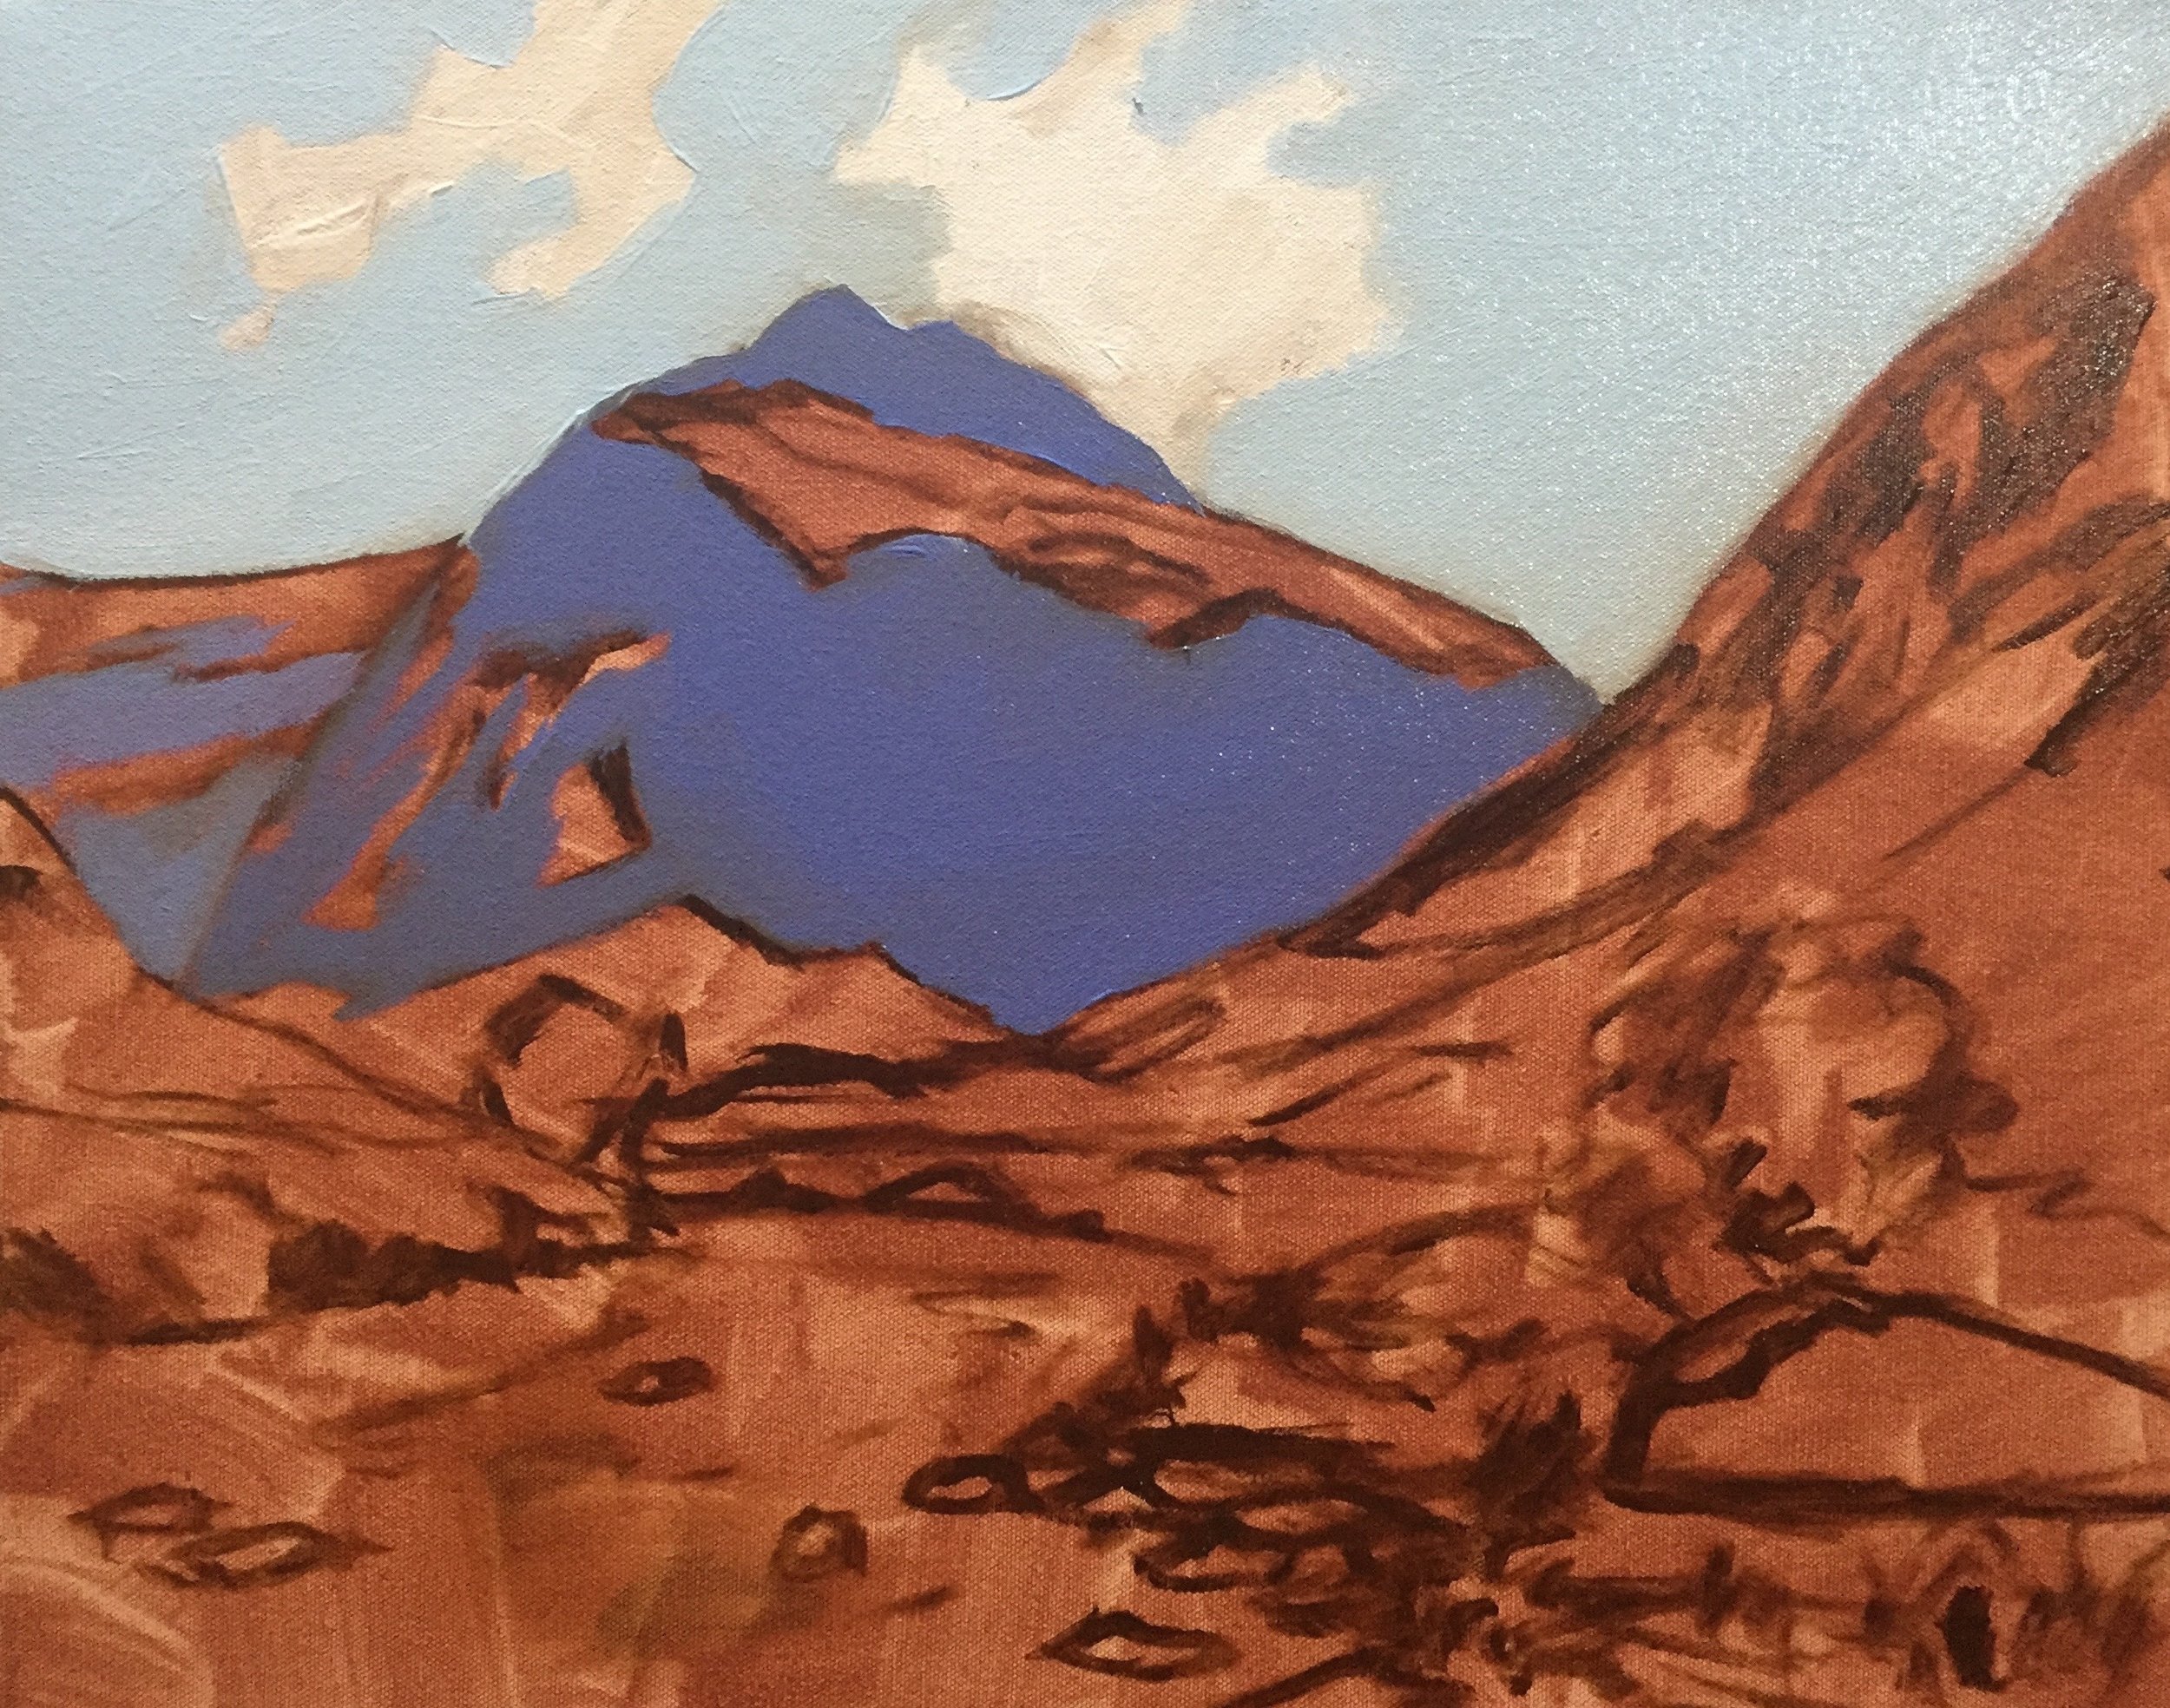
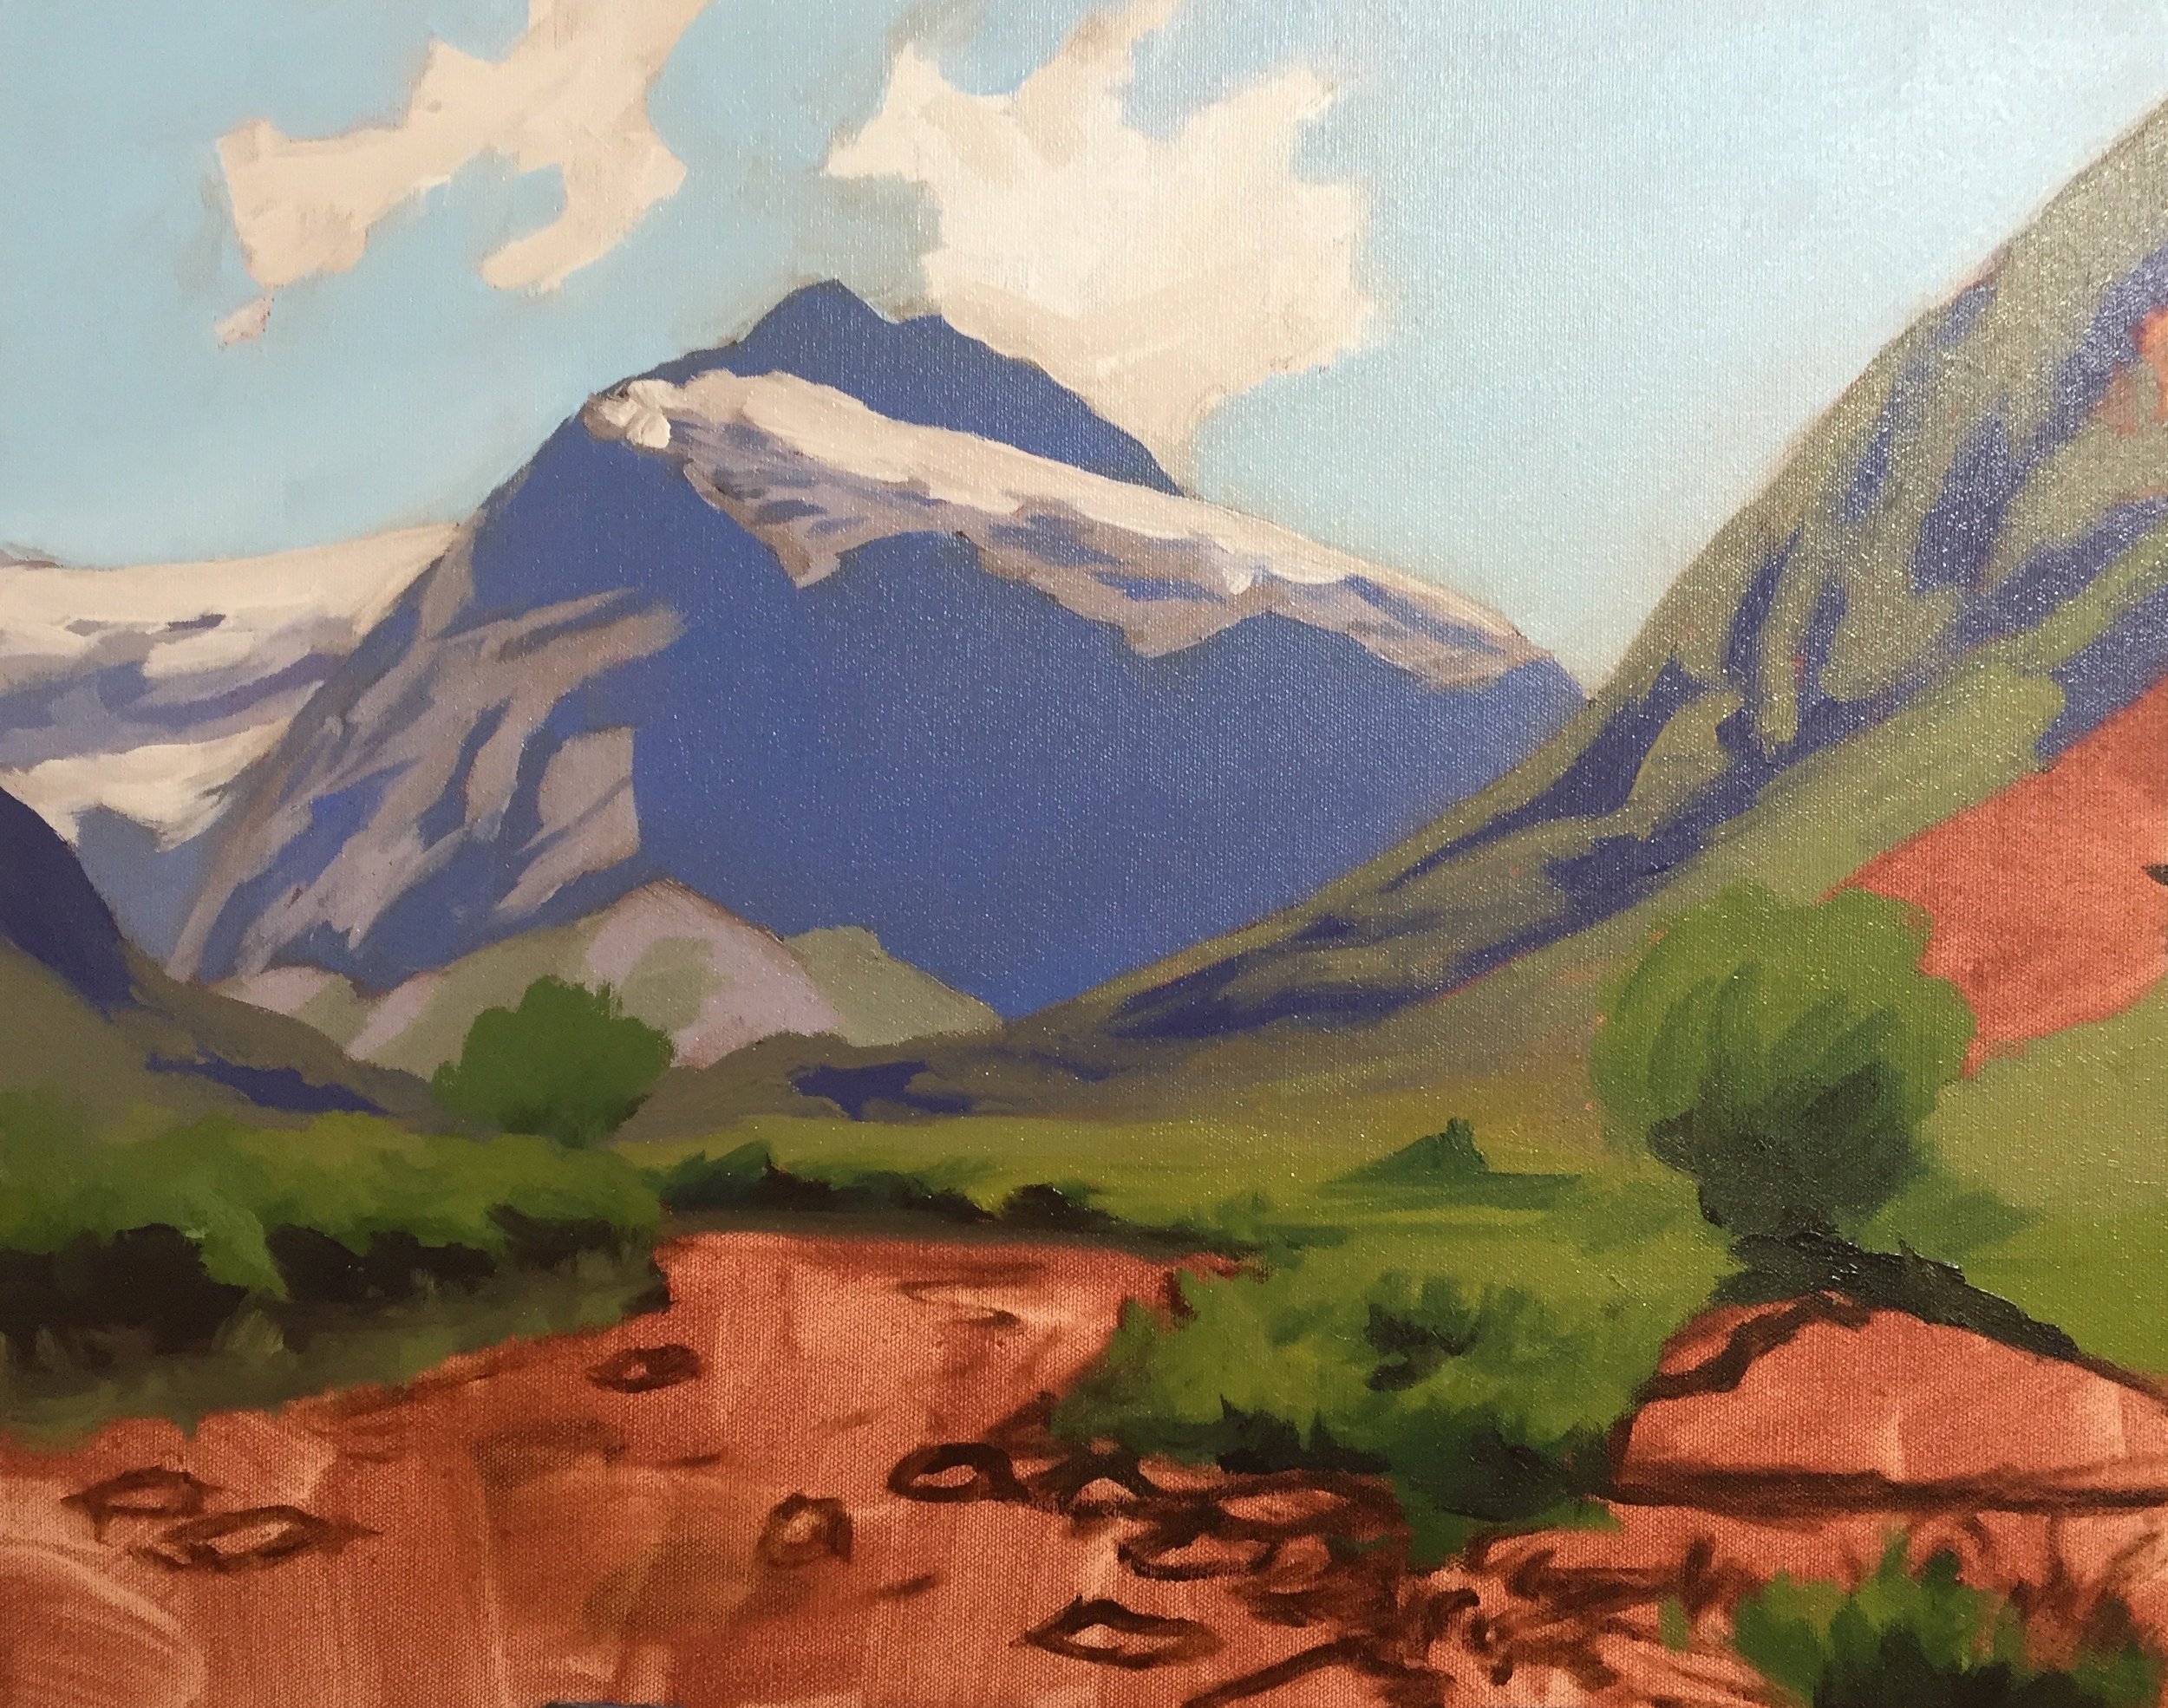
Step 4
Next, I begin to add the highlighted areas of the mountain rock face, again I want to keep my color desaturated so I mix a combination of ultramarine blue, burnt umber and a lot of titanium white.
The snow on top of the mountain is painted with titanium white mixed with a bit of burnt umber. As white is the lightest tone I don’t want it to come too far forward in the painting so adding burnt umber solves this. If required may also add a little ultramarine blue to the mix as well.
The green area of foliage at the bottom of the mountain was mixed using ultramarine blue with a small amount of yellow oxide, quinacridone magenta and a liberal amount of titanium white. The mixture will look like a warm grey on your palette but will appear green when next to the shadow areas of the mountains. It’s important to keep colors including green desaturated otherwise it will come too far forward in the painting and the illusion of depth will be lost.
Step 5
So now I am making a start on blocking in the mid-ground. At this stage I am not worried about detail at all, I just want to get in the basic shapes and colors of the painting before I can begin modeling the paint.
As landforms in the mid-ground are further forward than the mountain the tonal scale increases, therefore darks are getting darker and lights lighter, but I am still working in a mid-tone range. The shadows are darker than the shadow areas in the mountain. I have used the same combination of colors, ultramarine blue, burnt umber and quinacridone magenta but I have used less titanium white in the mix.
The green is mixed by adding more yellow oxide with ultramarine blue and a little quinacridone magenta and/or burnt umber to make the green a more organic color. You can vary the hues of the greens by adding a little thalo green and cadmium yellow deep. Use these two colors in small quantities otherwise, the mix will quickly become too saturated and you will lose the depth in the painting. You really want to introduce these colors if required.
Step 6
Next, I start to block in the foliage, grasses and bushes in the foreground. Here I am using my most saturated green by mixing cadmium yellow, deep, ultramarine blue, a little thalo green and quinacridone magenta. Thalo green really kicks up the saturation, so be careful with as it can quickly overpower your mixture.
The dark shadows in the foreground give the appearance of strong sunlight and I have mixed this using thalo green and quinacridone magenta. When mixed on the palette it can create a very dark tone as the red in the quinacridone magenta is the complementary opposite of green in the color wheel and so the two cancel each other out. Using these two colors allows them to mix harmoniously with the lighter greens as they already contain these two colors.
Never use a pre-mixed black in landscape painting, while it is tempting to do this, black mixed with other colors gives it an unnatural look.
Step 7
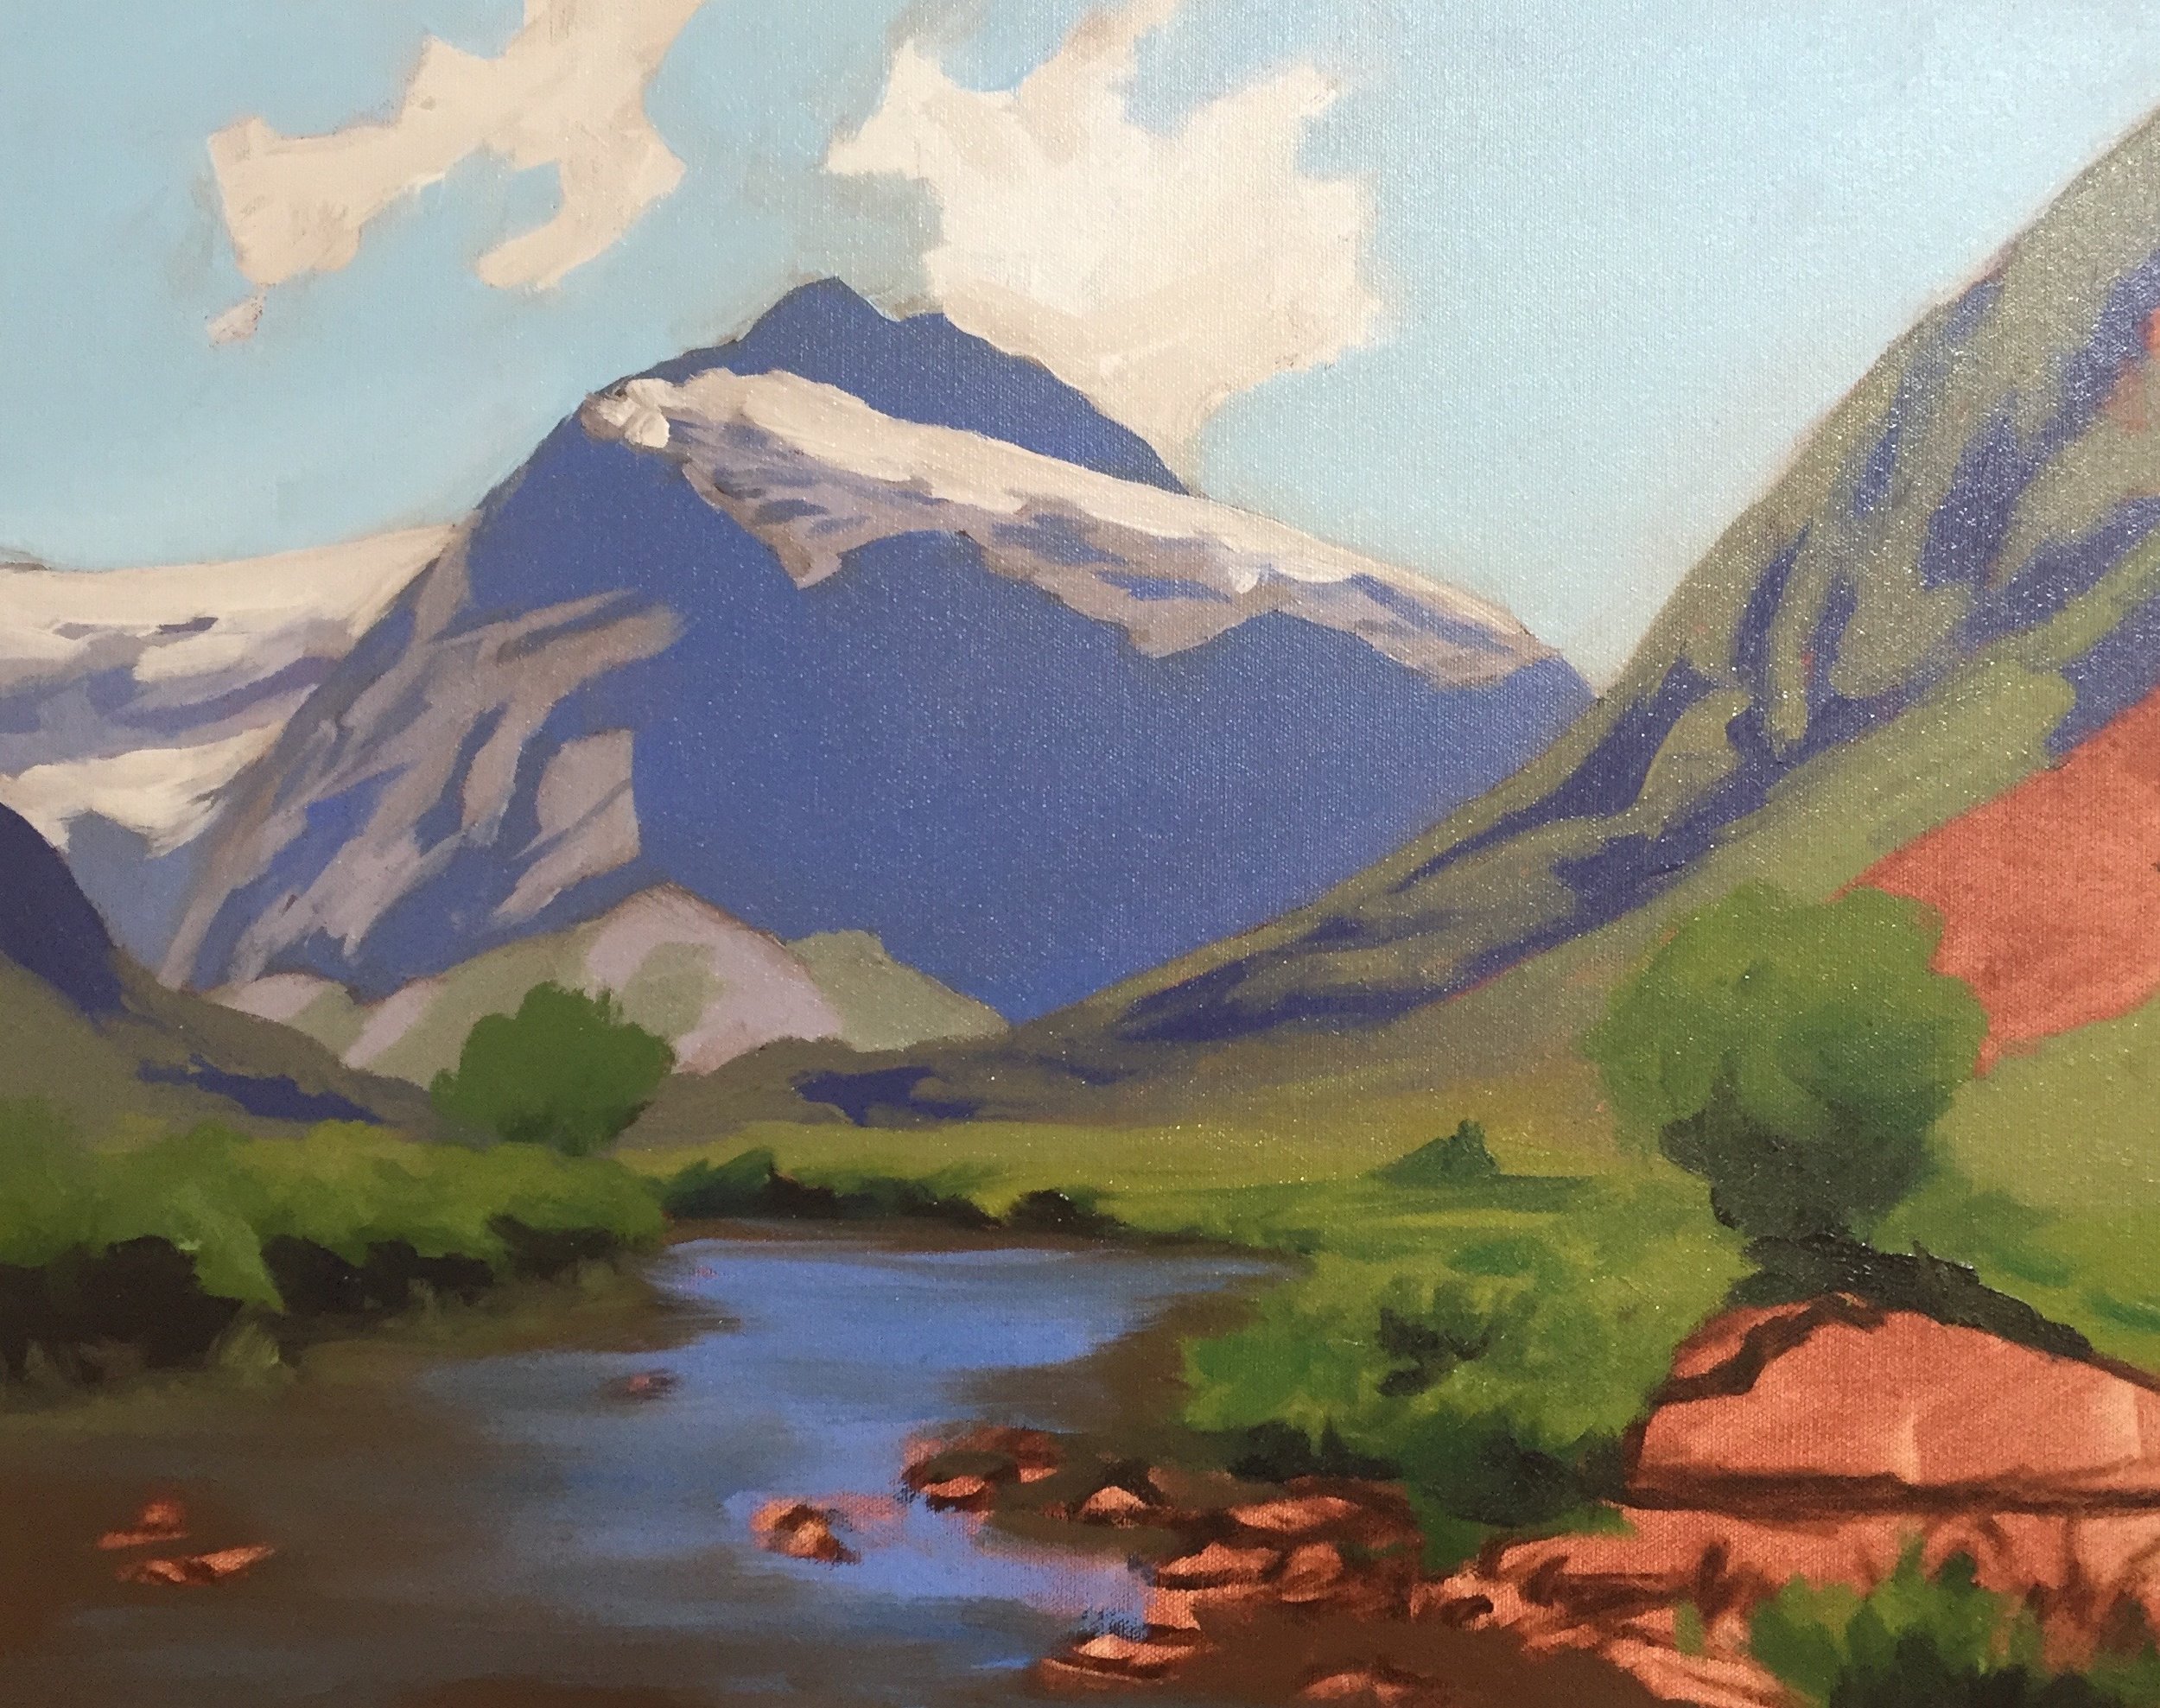
Here I start to block in the base colors of the river, again, I don’t want to get bogged down in detail here, I just want to get the basic colors and shapes.
The brown area of the water reflects the stones, boulders, and scree at the base of the river and I mix this with a combination of burnt umber, burnt sienna, yellow oxide and ultramarine blue.
Given the blue in the water if reflecting the sky, I use a combination of cobalt blue, a little burnt umber and titanium white.
Step 8
Next, I have started to block in the basic colors of the large boulder on the right and the smaller stones and scree at the bank of the river. I have mixed these colors again using ultramarine blue, burnt umber, quinacridone magenta and titanium white.
The highlighted colors were mixed using the same colors but with more titanium white. Adding a little yellow oxide to the mix also warms up the color.
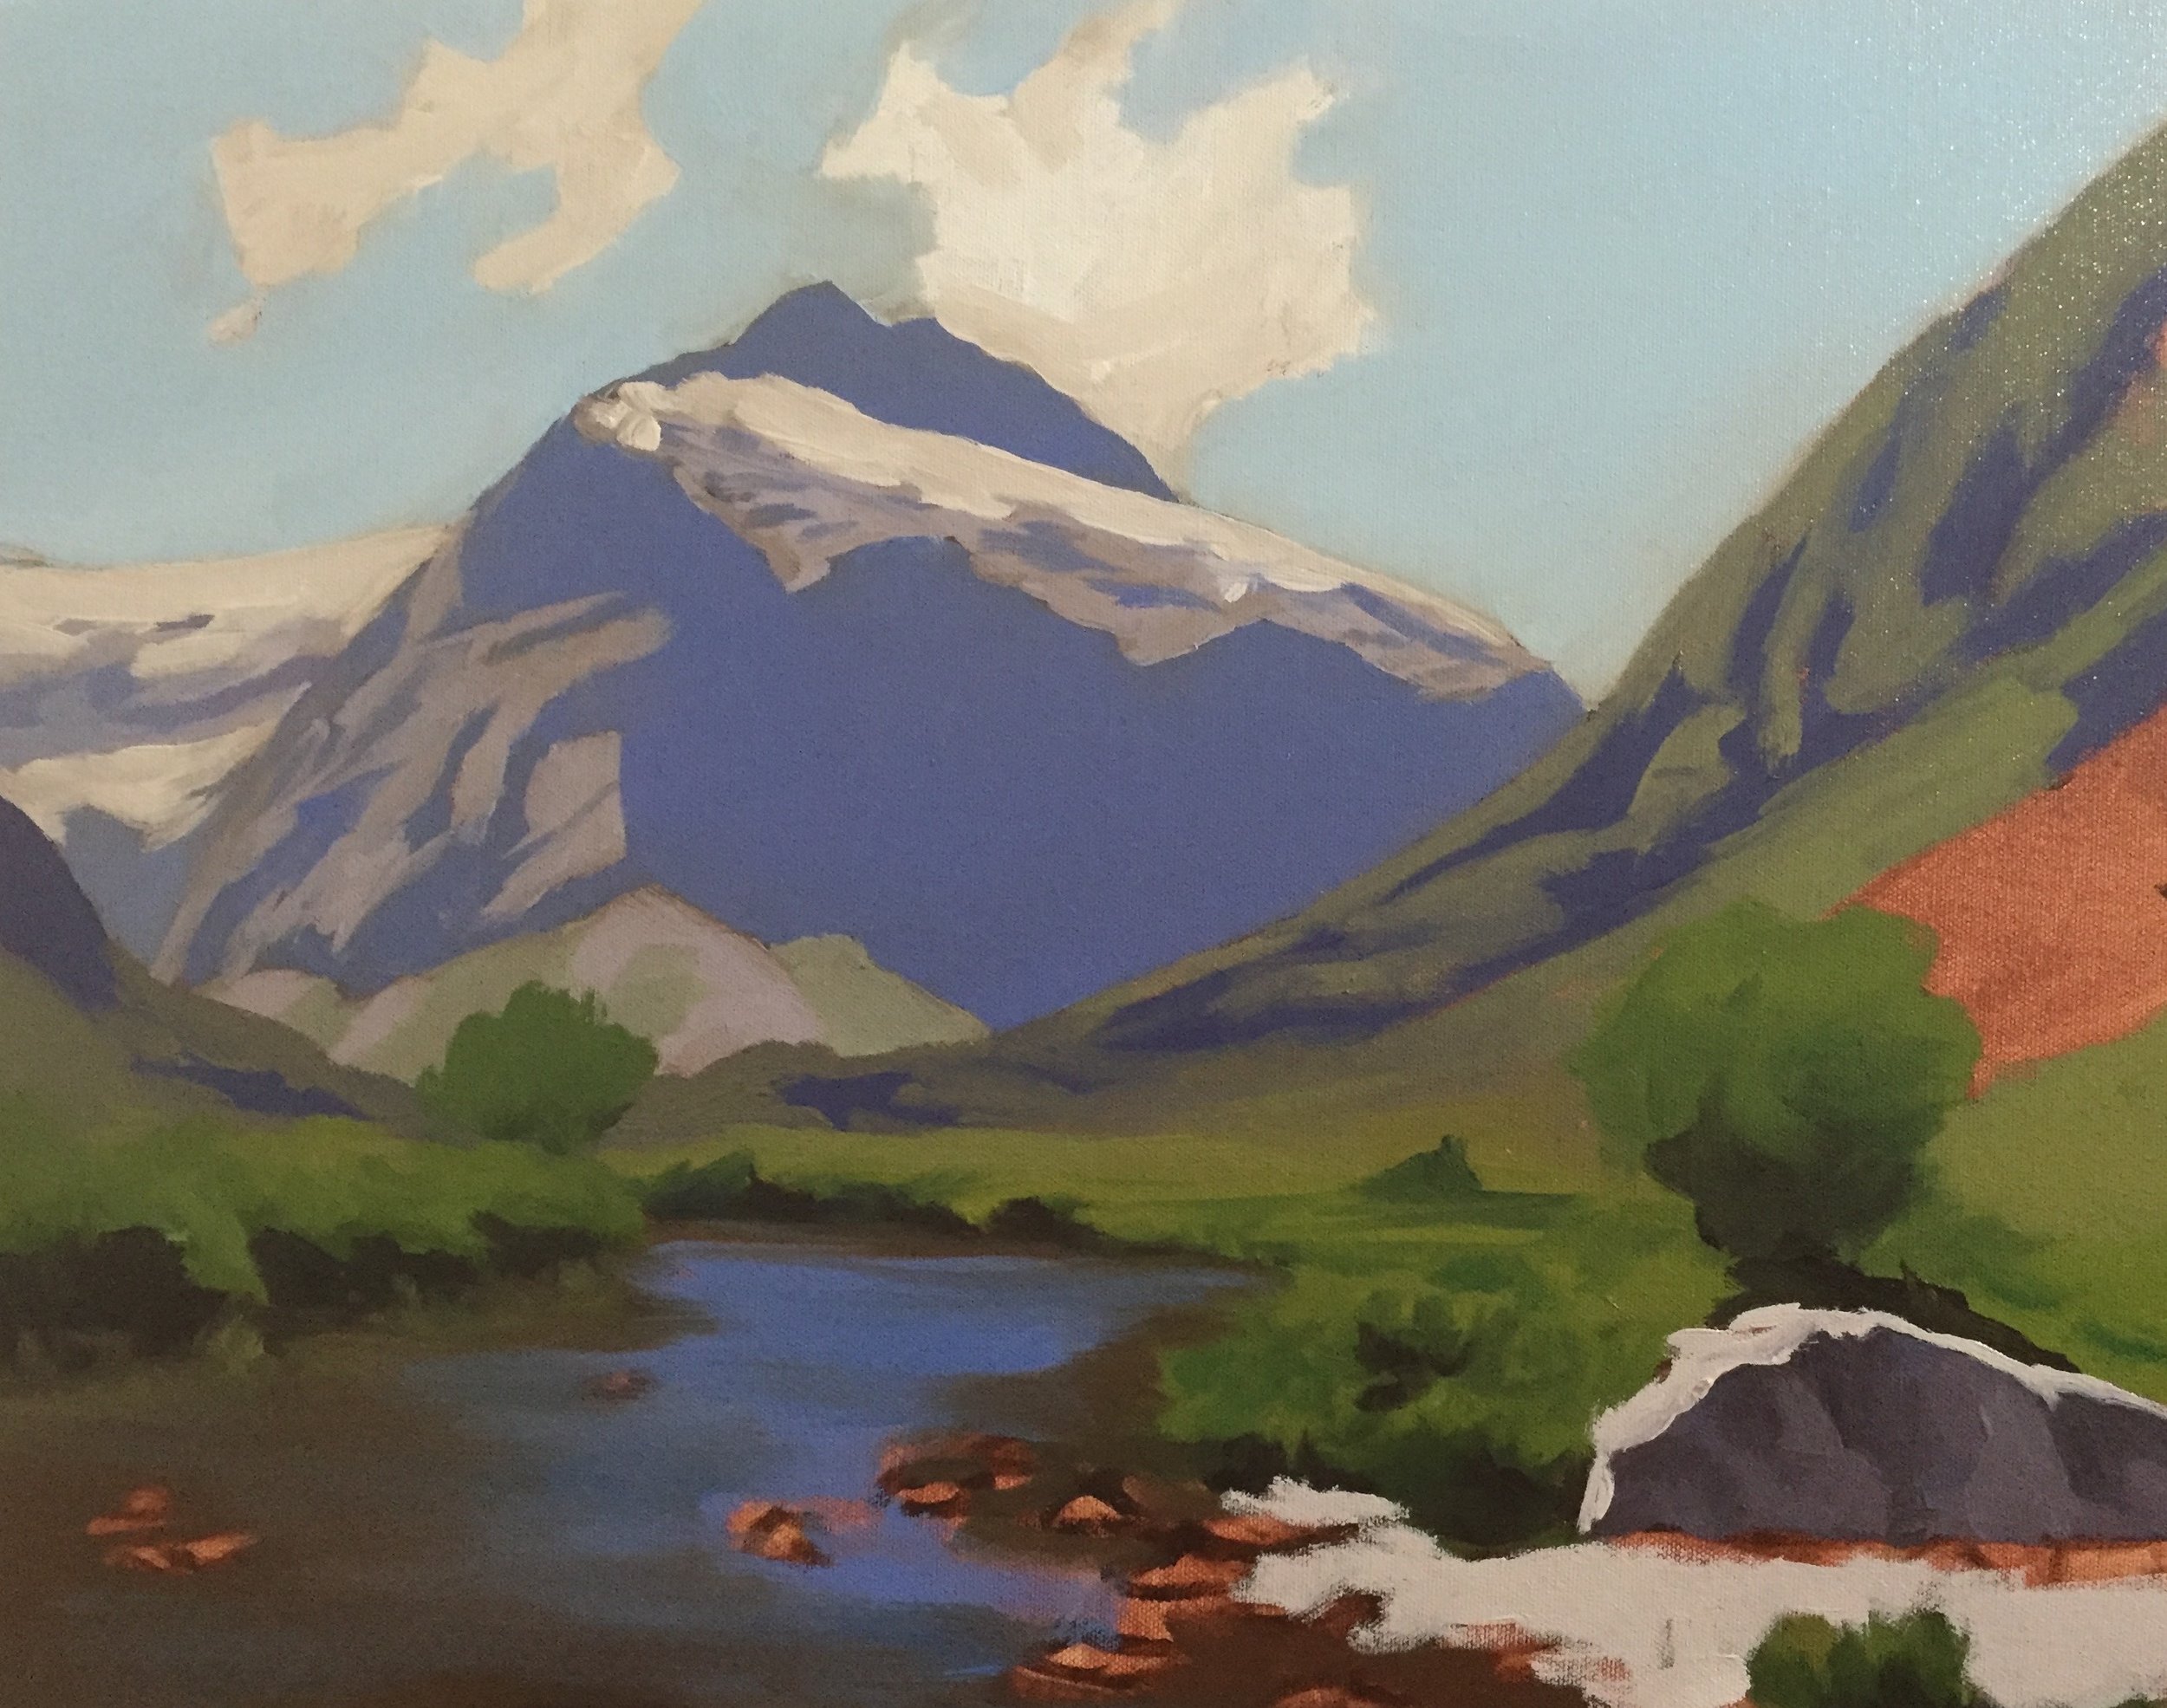
Step 9
Now that I have blocked in the painting it is necessary to let it dry so I can begin modeling the paint and building up the detail. I have started to paint the finer detail of the mountain rock face on in the shadow area of Mount Talbot. I’m using the same colors I used before, ultramarine blue, burnt umber, and quinacridone magenta, but with more titanium white to make it a slightly lighter tone than the initial color.
I do not wish to go overboard with detail in the mountain, given it’s the furthest away object in the painting. The suggestion of detail is often enough as the brain fills in the gaps, too much detail can be distracting and may compromise the composition.
I have started to model the paint of the mountainside in the midground. I have used a small angled wedge brush and a round brush to form the shapes of the distant beech trees and the grass on the side of the mountain. I have increased the saturation of my greens but being careful not to make it too saturated which would bring the mountain too far forward in the painting.
Step 10
In this stage of the painting, I have worked on the grass/meadow area of this painting again using cadmium yellow deep, ultramarine blue as a base and adding, where required, thalo green to increase the saturation and quinacridone magenta, burnt sienna, burnt umber and yellow oxide to ‘earth’ my greens. This is where you can play around with creating different hues of green. I apply this with an angled wedge brush to start creating the suggestion of clumps of grass.
The stones in the river bed were painted using a small flat brush, combining burnt umber, burnt sienna, ultramarine blue and titanium white. I am mindful that the running water will distort the shapes of the rocks. I still make sure I form the shapes of the rocks by painting in the shadow areas.
Step 11
In this stage of the painting whilst the paint in the foreground is still wet I have started to refine the details in the mountain and the midground, adding highlights to the illuminated rock faces and the grassy areas in the mid-ground.
I have painted the foliage on the trees using a combination of ultramarine blue, cadmium yellow deep, mixed with a little thalo green, quinacridone magenta and titanium white. The light green areas on the bushes give the appearance of bright light reflecting off the leaves.
Step 12
I have introduced the ripples on the flowing water of the river using a round brush, which I mixed using cobalt blue, a little cobalt teal and a little burnt umber to take out some of the saturation of the blue. As it’s a reflection of the sky, I am using the same colors that I used in my sky mix.
Step 13
Here I have added more detail to the clumps of grass by using a modified flat brush and fan brush in which I have cut the bristles at different lengths. The modified brushes may look rough as guts but they work a treat for painting grass.
I am also building up the detail of the stones and boulders in the stream. The dark shadow areas of the stones are mixed using ultramarine blue and burnt umber which creates a very dark tone. As I’ve said before, never use pre-mixed black, it looks awful and unnatural! You make your own black by mixing ultramarine blue and burnt umber or quinacridone magenta and thalo green.
Step 14
At this stage of the painting, I am now adding the fine detail that makes the picture come alive. I’m saving my special effects and tonal best for last. I have added highlights to the stones and boulders in the river by mixing titanium white with a little burnt umber and yellow oxide. For some stones, I have used burnt sienna to give a variety of different rock colors. I have painted some reflected light in some of the shadows of the rocks and stones. Mixing quinacridone magenta with burnt umber gives the shadows a little heat, adding to the illusion of a bright, hot New Zealand summer’s day.
I have also begun to paint some sparkles on the river using titanium white mixed with a bit of ultramarine blue, burnt umber and quinacridone magenta so it’s not entirely white.
I have also added shades of burnt umber mixed with quinacridone magenta to the shadow areas of the grass clumps. This helps to balance the green hues I have created and makes the grass and the colors look more natural and organic.
Step 15 (Final Step)
This is where I add all the fine detail and finesse the painting, adding highlights in the water in a few small areas mixing titanium white with a bit of yellow oxide. I have painted small clumps of grasses amongst the stones and a few flowers within the thick grass clumps, here I mixed cadmium yellow, ultramarine blue, thalo green, and a little burnt sienna.
I have also finished painting the highlights on the distant scree and boulders in the mid-ground as well as the suggestion of branches on the bushes in the foreground.
Thank you for reading 😊
